If you’re just starting out, then a simple program like Adobe Photoshop might be a good choice. This program is great for learning the basics of graphic design and experimenting with different effects. Photoshop is a versatile tool that can be used for a variety of applications and graphical creations:
Photoshop Tools Content Aware Fill Content Aware Scale Photoshop Remove Background 3D in Photoshop Photoshop Properties Panel Define Pattern Filters Gif Animation Photoshop Video Editing Photoshop File Formats Photoshop Alternative Free
Photoshop’s Origins
Photoshop was created in 1987 by two siblings, Thomas and John Knoll, who sold the circulation permit to Adobe Systems Incorporated in 1988. Thomas Knoll, a Ph.D. understudy at the University of Michigan, started composing a program on his Macintosh Plus to show grayscale pictures in a monochrome presentation. This program caught the eye of his brother John, an Industrial Light and Magic representative, who suggested that Thomas transform it into an undeniable picture-altering program. Thomas required a six-month break from his examinations in 1988 to team up with his sibling on the program.
Editing Tools and Support
As an app for editing images, Photoshop has many different editing tools such as brushes, text, selections, color modes, and many more. You can use this app on your iPad or on a computer for personal or professional purposes. It supports multiple platforms like Android, iOS, Windows, and macOS. It provides you with the ability to edit any type of image file, and it also provides you with the ability to export and share your edited images on multiple platforms. All along, Photoshop could save records in different formats, including TIF, JPEG, PDF, and GIF. These documents are more modest than PSD records since they come up short on the editable elements of a PSD record. These configurations are expected to involve the record in distributions or on the web.
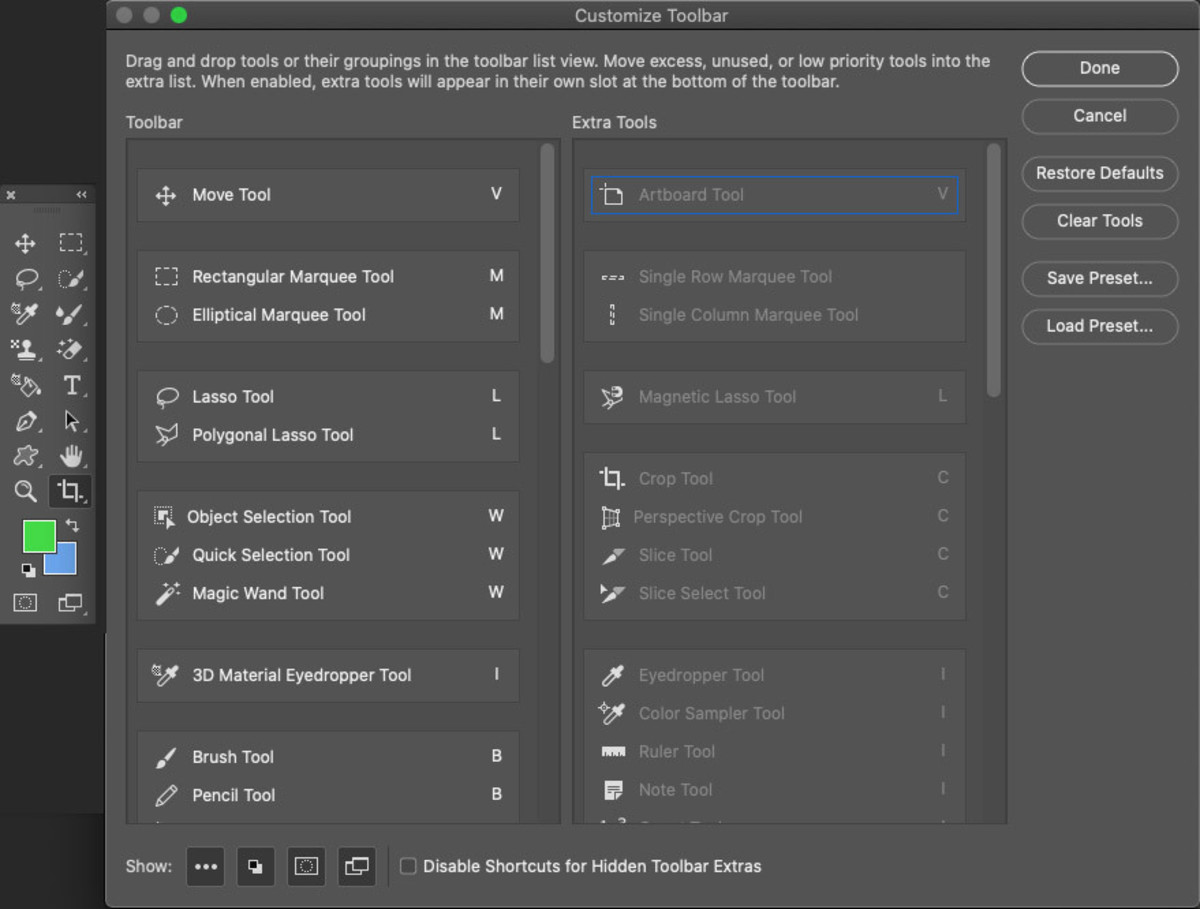
The Toolbar
When you send off Photoshop, the left sidebar with different apparatuses with numerous picture-altering capabilities appears on one side of the screen. The Devices bar consequently shows up on the left half of the window. In the event that you don’t see the tools bar when you open Photoshop, go to the Window menu and select Show Tools. These tools are typically classified as drawing, painting, estimating and routing, determining, composing, and modifying. A few devices contain a little triangle at the base right of the tool stash symbol. These can be extended to uncover comparable instruments. While more current renditions of Photoshop are refreshed to incorporate new devices and elements, there are a few repeating instruments.
Photoshop Tools
Let’s take a look at some of the most useful Photoshop tools. my self
Move Tool (V)
If you are using Photoshop and want to learn about one of the basic tools, look no further than the move tool! The move tool allows you to select and move around different elements in your image. This is a great tool for rearranging elements or for making small adjustments to your composition. To use the move tool, simply select it from the toolbar on the left-hand side of the toolbar. Then, click and drag on the element that you want to move. You can also use the arrow keys on your keyboard to nudge an element in small increments. If you want to move multiple elements at once, you can use the move tool to select multiple layers by holding down the Shift key while you click on each layer. Then, you can move all of the selected layers at once by clicking and dragging. The move tool options bar has another option “Show Transform Controls” With this option, you can scale, rotate, move, and reshape the selected object.
Marquee Tool (M)
The marquee tool is a great way to quickly select an area of an image. The Photoshop marquee tool is one of the most commonly used tools in Photoshop. It allows you to select an area of an image by drawing a box around it with your mouse. To use the marquee tool, simply click and drag your mouse around the area you want to select. You can also use the marquee tool to select multiple areas of an image by holding down the Shift key while you click and drag. Once you’ve selected an area with the marquee tool, you can then use other tools to edit that area. For example, you can use the paint bucket tool to fill the area with a color or the eraser tool to erase it.
Lasso Tool (L)
The Lasso Tool is one of the most essential tools in Photoshop. It allows you to freely select any shape or object in your image. You can use it to select a specific area to edit or to make a precise selection for masking. The Lasso Tool is also very useful for removing unwanted objects from your images. To use the lasso tool, simply click and drag around the area you want to select. Holding down the Shift key while clicking and dragging allow you to add to your selection. To subtract from your selection, hold down the Alt key (Option key on a Mac).
Polygon Lasso Tool (L)
You’re always looking for ways to speed up your workflow in Photoshop. The polygonal lasso tool is a fast way to make selections that are more precise than with the regular lasso tool. In this blog post, we’ll show you how to use the polygonal lasso tool to make a selection in Photoshop. Open Photoshop and then the image you wish to edit. Then, select the polygonal lasso tool from the toolbox. Now, click around the edge of the area you want to select. As you click, you’ll see a line being drawn. Keep clicking until you’ve gone all the way around the edge of the selection. Then, double-click the mouse button. You’ll see that the area you selected is now surrounded by a moving dashed line.
Magnetic Lasso Tool (L)
If you’re looking for a tool to help you make precise selections in Photoshop, then you should check out the Magnetic Lasso Tool. This tool uses an adaptive algorithm to create selections based on edge contrast.
First, make sure the layer you want to select is active. Then, select the Magnetic Lasso Tool from the Tools palette. Next, click on the edge of the object you want to select. The Magnetic Lasso Tool will automatically create a selection around the object. To complete the selection, simply click on the starting point.
And that’s it! The Magnetic Lasso Tool is a great way to quickly and easily select objects in your image.
Selection Tools
Magic Wand Tool (W)
The Magic Wand tool is a selection tool. This tool allows you to select an area of an image based on color, and then you can edit that area without affecting the rest of the image. It’s most often used to select solid backgrounds and color areas. To use the Magic Wand tool, simply click on the area of the image that you want to select. Photoshop will determine tolerance and then select pixels that are similar in color to the one you clicked on. Tolerance determines the color range of selected pixels. Enter a number in pixels between 0 and 255.
Quick Selection Tool (W)
If you’re looking for a quick and easy way to select objects in your image, the Quick Selection Tool is the way to go. This versatile tool allows you to quickly and easily select areas of your image by painting over them with your mouse. The Quick Selection Tool is located in the Tools palette, under the Quick Selection Tool (w) icon. To select an object with the Quick Selection Tool, simply click and drag your mouse over the area you want to select. The Quick Selection Tool will automatically create a selection border around the object. If you accidentally select an area you don’t want, you can deselect it by holding down the Alt (Windows) or Option (Mac) key and clicking inside the selection border. You can also add to your selection by holding down the Shift key and clicking additional areas.
Object Selection Tool (W)
Object Selection tool was first introduced in Photoshop CC 2020, Object Selection tool, Quick Selection or Magic Wand tools to make quick selections, Photoshop Object Selection automatically selects objects within a defined region the tool is very powerful that allows you to select specific objects in your image. This tool can be used to select specific items in a photo such as objects, people, or text. The Object Selection Tool can also be used to select specific areas of an image. The Object Selection Tool can be found in the Tools menu. The following steps will show you how to use the Object Selection Tool.
- Open your image in Photoshop.
- Click on the Tools menu and select the Object Selection Tool.
- Use the cursor to select the object or area you want to select.
- Use the selection.
Crop and Slice Tools
Crop Tool (C)
Photoshop cropping tool is the process of removing, straightening, rotating, and expanding your canvas. There are several ways to use the crop tool. The easiest way is to drag the crop handle (the small square at the bottom of the crop tool). When you release the mouse button, the crop tool will resize the image based on the cursor position. Crop Tool now uses content-aware technology to intelligently fill in the gaps when you Crop images for straightening or rotating an image, or expanding your canvas.
Perspective Crop Tool (C)
The Perspective Crop Tool is a handy tool for cropping an image. It allows you to crop an image in a way that preserves the perspective of the image. You can use the tool to crop an image so that it is narrower or wider, higher or lower, closer or further away from the center of the image. To use the Perspective Crop Tool, first select the image you want to crop. Next, use the mouse to drag the cursor and hold down the shift key whilst dragging around the image. When you have selected the area, you want to crop, release the mouse button. The Perspective Crop Tool will automatically crop the image to the selected area.
Slice Tool (C)
The Slice tool allows you to divide a website layout into smaller sections which will loads the image gradually until it’s all on the screen and get HTML file.
Slice Selection Tool (C)
You can select slices using the slice select tool. You can also move, resize, or align the slice with other slices. In addition, you can designate a name, type, and URL for the slice. Each slice can be optimised using the settings in the save for web in( File – Export ).
Frame and Eyedropper
Frame Tool (K)
The Frame Tool in Photoshop can be used to create a frame around any object in your photo. This can be useful for adding a border, framing a photo, or simply giving your photo a more finished look.
Eyedropper Tool (I)
In Photoshop, there is an Eyedropper Tool that allows you to copy colors from one object to another and save the color in swatches. This is a handy tool for quickly copying colors from one object to another.
Color Sampler Tool (I)
If you’re a Photoshop user, you’re probably familiar with the Color Sampler Tool. This nifty little tool lets you sample different colors from within your image, which can be helpful when you’re trying to find the right color for a certain part of your image.
3D Material Eyedropper Tool (I)
The Photoshop 3D Material Eyedropper Tool is an essential tool for creating 3D materials in Photoshop. With this tool, you can easily select and copy materials from images, either as a layer or as a mask.
Ruler Tool (I)
The Photoshop Ruler Tool can be incredibly useful for isolating portions of an image for retouching or compositing. To use the Ruler Tool, first click the “Ruler” icon in the toolbar and select the type of ruler you want to use. The default ruler is a horizontal one, but you can also use a vertical or diagonal ruler. Once you have selected your ruler, double-click on the ruler to activate it and start marking off the boundaries of the area you want to work with.
Note Tool (I)
The Photoshop Note Tool is a handy tool that can be used to add notes to your images. To use the tool, first, open an image that you want to add notes to. Next, select the Note Tool from the toolbar and select the area where you want to add the notes. You can then type in your notes and press Return or Enter to save your changes.
Count Tool (I)
In Adobe Photoshop, figure out how to utilize the counting apparatus to include objects in a picture. Photoshop can also consequently include various chosen regions in a picture.
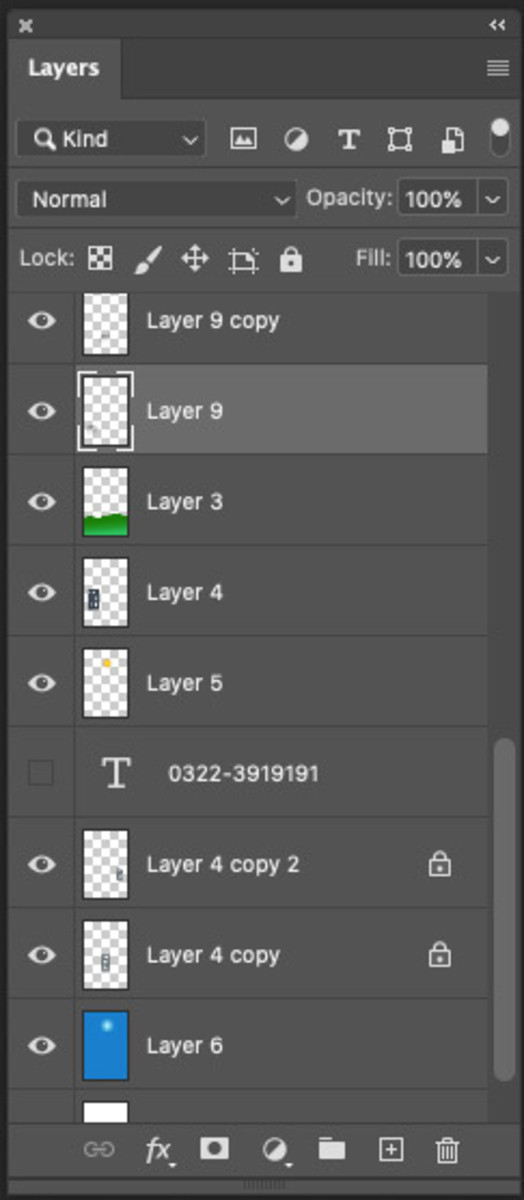
Layer Panel
Photoshop Layers
Layers (F7)
Layers are one of the most important features of Photoshop, and understanding how to use them is essential to becoming a master of the software. By using layers, you can put several images on a single canvas and adjust the opacity, fx (layer style), create groups, adjustment, mask, blend modes, and lock each layer so that they’re mixed just right. Adjusting these properties can result in a more accurate or imaginative composite. my self You can create layers to organize your work. By using layers, you can work on one object in your document without affecting other parts. When you create a new document in Photoshop, if you have chosen background content white in preset detail, the layer panel will show one layer as a background layer. The layer should be locked. This means that you should not work on the background layer. You have to create a new layer for every graphic, text, and image. By doing this, your work on the document will be easier. To create a new layer, simply go to the button at the bottom of the Layers panel. You can also use the keyboard shortcuts Shift + Ctrl + N (Windows) or Shift + Command + N (Mac) and F7 to open and close the layer panel. That way, you can apply masks and other filters to specific layers as needed. When you create a new layer, it automatically appears above the layer that was active when you created it. You can change the layer order by dragging and dropping the layers in the Layers panel, and when you paste anything, a layer will be created automatically. For moving a layer up or down in the Layers panel, first, select the layer, then use the keyboard shortcuts ctrl + ] for up or ctrl + [ (Windows) for down the layer for (Mac), Command + ] for up or Command + [ for down the layer. Each layer has an eye symbol, as seen in the layer panel. You can enable or disable the layer by clicking on the eye symbol. If you want to move two or more layer objects together, then you can link those layers using the link option. If you want to duplicate the layer, then the easiest way is to use the keyboard shortcut Ctrl + j (Windows) or Command + j (Mac). How to merge layers If you want to merge layers, first select the layers that you want to merge, then use the keyboard shortcuts ctrl + e.
What Is a Smart Object Layer?
In Photoshop Smart Objects layers that contain image data from raster to vector images, such as Photoshop or Illustrator files. Smart Objects preserve an image’s source content with all its original characteristics, enabling you to perform non-destructive scaling, rotating, and other transformations. You can delete any layer in Photoshop - just select the layer and go down the layer panel. There is a trashcan option just click on it and remove the layer or right-click with the mouse and select the delete option.
Photoshop Adjustment Layer
If you’re not already using Photoshop adjustment layers, you’re missing out on one of the most powerful tools in the program. Adjustment layers allow you to make nondestructive edits to your images, meaning your image without permanently changing values. There are a number of different types of adjustment layers, each of which can be used to achieve different results. For example, you can use a Levels adjustment layer to adjust the brightness and contrast of your image, or a Hue/Saturation adjustment layer to change the color. To use an adjustment layer, simply click on the layer in the Layers panel and then make your changes. When you’re done, you can simply turn off the layer to see what your image looks like without the changes.
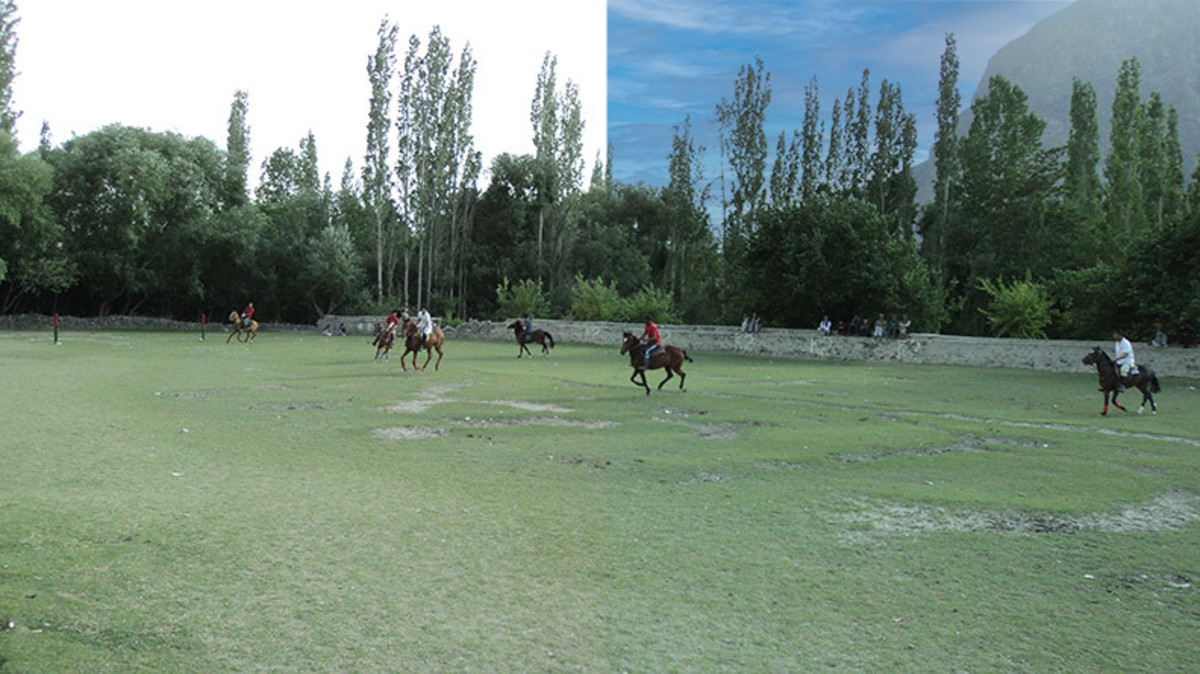
Swapping out the sky in a photo with a new one.
Sky Replacement
Photoshop Sky Replacement (in Edit Penal) is a process of swapping out the sky in a photo with a new one. Photoshop has many sky options, and you can even upload your own sky. A lot of people use Photoshop’s Sky Replacement because it makes the background look so much more attractive and appealing.How to change the sky: go to the Edit tab > Sky Replacement. my self
Content Aware
Content Aware
Content Aware Fill
Content Aware Fill is a powerful tool that can save you a lot of time when editing images. my self It’s a tool that can save you a lot of time when editing images. Essentially, it allows you to remove objects from an image and have Photoshop automatically fill in the space with content that is similar to the surrounding area. If the Content-Aware Fill option is greyed out, (go to Edit > Content Aware Fill…) Use a selection tool like the lasso, marquee, etc. to highlight your content, then use the content-aware fill option. It will let you see the new content that it’s going to create based on the original selection.
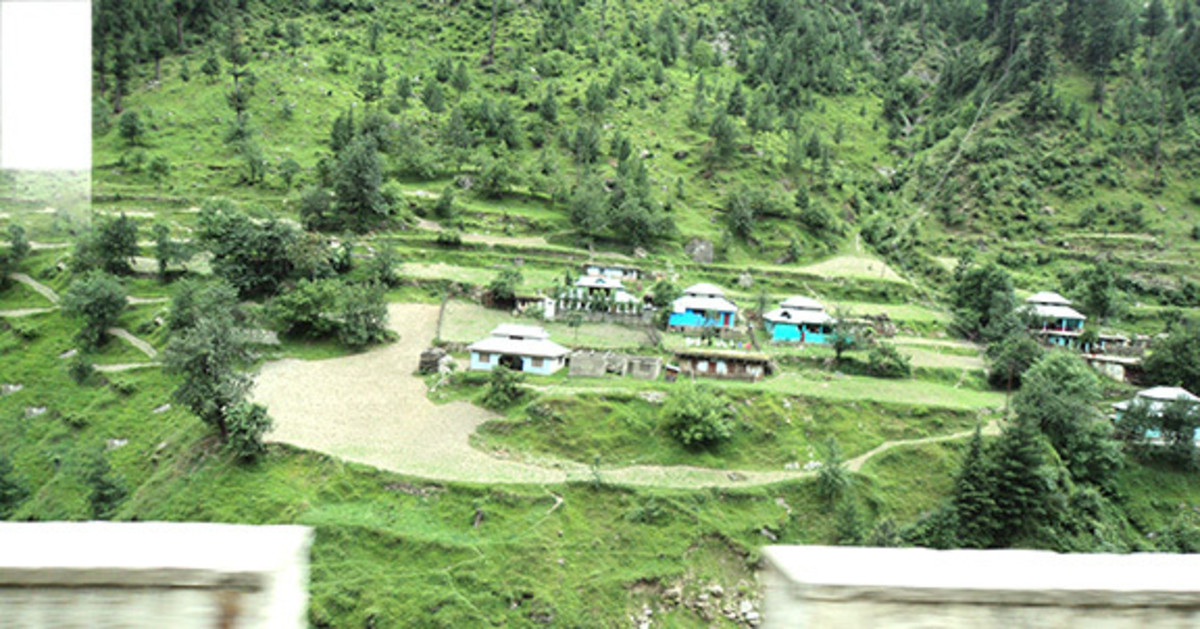
Content Aware Scale
The tool has been released by Adobe that allows you to change the size of objects in an image without distorting the main elements in the scene. it’s a tool that allows you to resize an image while preserving the important content within the image. This is a great tool for resizing photos for social media, for example, because you can keep the focus of the photo in the center while still resizing it to fit within the dimensions of the social media platform. To use the Content Aware Scale, simply select the layer you want to resize in the Layers panel, then go to Edit > Content Aware Scale. A dialog box will appear, and you can enter the new dimensions for your layer. Be sure to check the “Preserve Details” and “Preserve Shape” options to get the best results. Once you click OK, Photoshop will do its best to preserve the important content within your image.
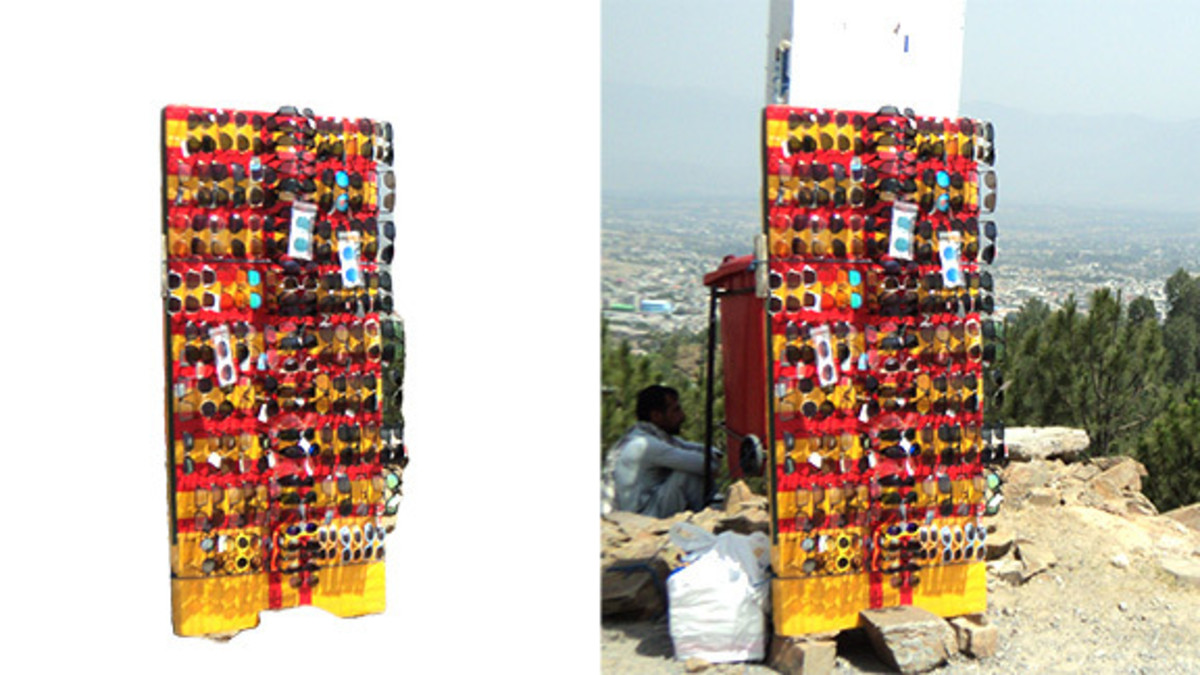
Changing Background
In Photoshop, how do you remove the background from an image? There are different ways to remove the background, and each has its own advantages and disadvantages. my self The easiest way to remove the background: There are two easy ways you can remove the background from your image. The easiest way is to first unlock the background layer, then go to properties, Quick actions option. The first option is to click on Remove Background, then wait a few seconds, and the background will be removed automatically. The second option is to click on the selected subject and wait a few seconds. The object will select it. Then copy and paste your object into the new layer. After that, you can change the background.
Properties Panel
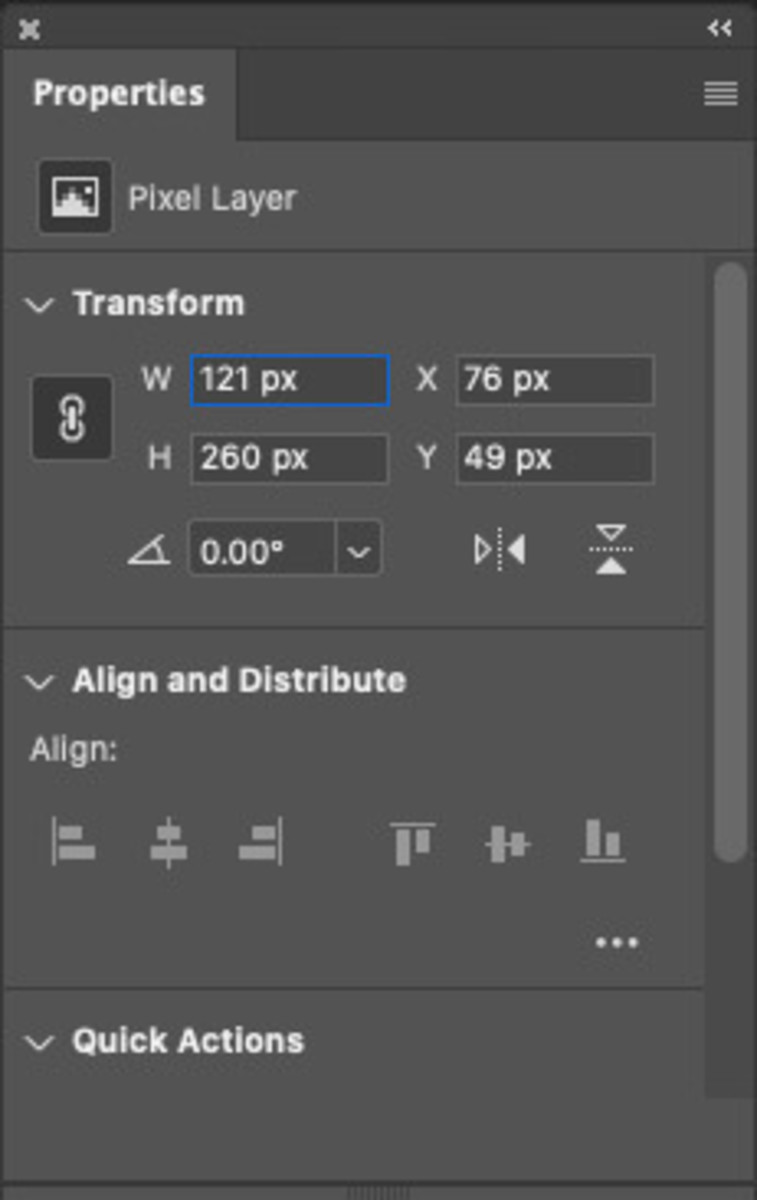
Photoshop Properties
The Photoshop properties panel is one of the most important tools in the Photoshop toolbox. It allows you to view and change the properties of your layers, selections, and even your whole image. my self There are different areas in the properties panel. There are several options and settings for each section.
Filters
Photoshop Filters: There are also a lot of other, less commonly used filters. There are a lot of different filters that you can use in Photoshop to change the way your photos look. You can use them to make your photos look more creative, or to correct problems with the way they look. One of the most popular filters is the Gaussian Blur filter. This filter can be used to make your photos look softer and more dreamlike. It can also be used to correct problems with sharpness or to make a photo look less busy. There are also a lot of other, less commonly used filters. You can also add third-party filters.
Transform
If you want to resize an image or text in Photoshop, then use Ctrl + t (Windows) or cmd + t (Mac) for transform. With this option, you can scale, rotate, move, and reshape the selected object. The transform option also includes the move tool. The simplest way to resize an image or text in Photoshop is with the Free Transform tool.
3D Model
3D and Video Editing
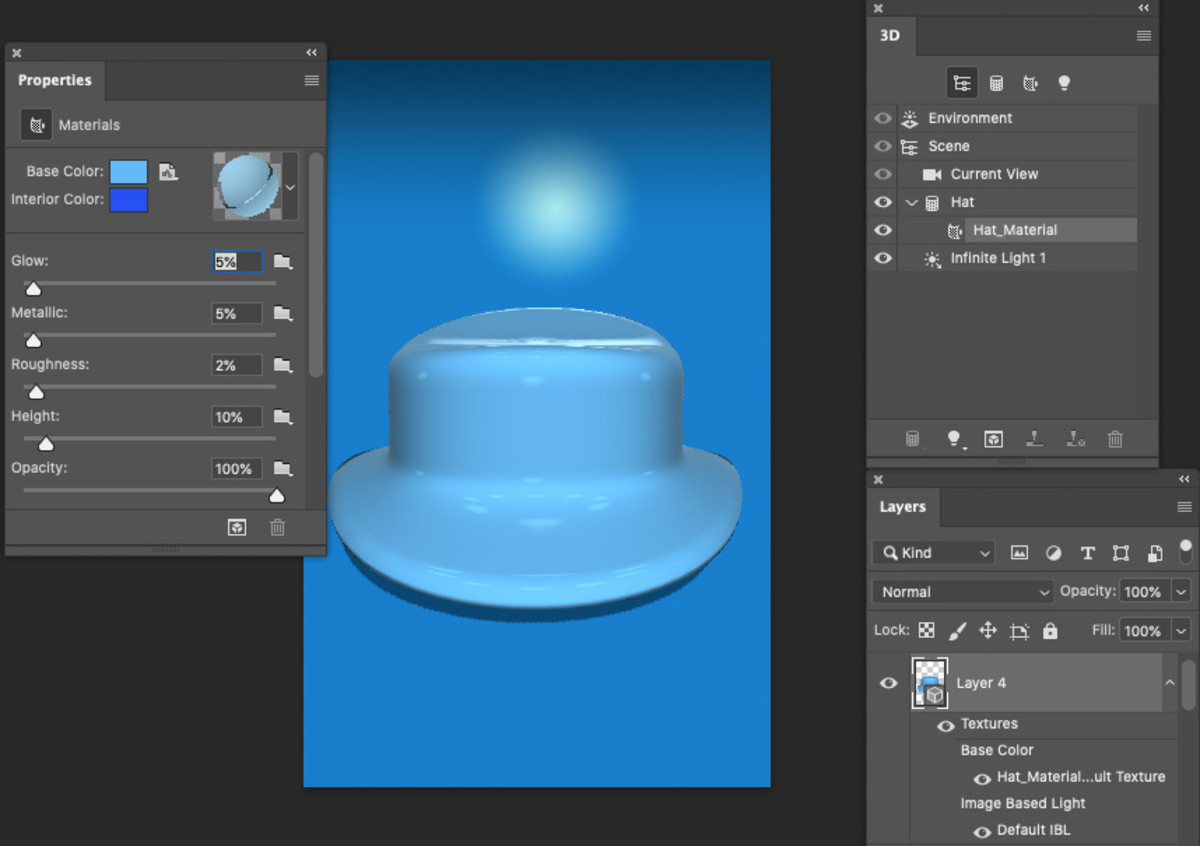
3D in Photoshop
Photoshop can take 2D layers and turn them into basic 3D models. You can then move them around in 3D space, change how they look, add lighting, or merge them with other 3D objects. my self
Photoshop Video Editing
Choose the right software for your project. Photoshop is great for editing videos, but there are other software options that may be better for specific tasks. For example, Adobe Premiere Pro is better for editing videos with complex effects and transitions. Use layers to organize your video. Your film can be kept structured and edited easily by using layers. Layers can be used to combine text, audio, and video. That makes it simple. The fundamental video editing capabilities in Photoshop allow you to divide, cut, splice, and join numerous videos. Additionally, you can mute, fade in and out, and add, or remove an audio track.
GIF
Gif Animation
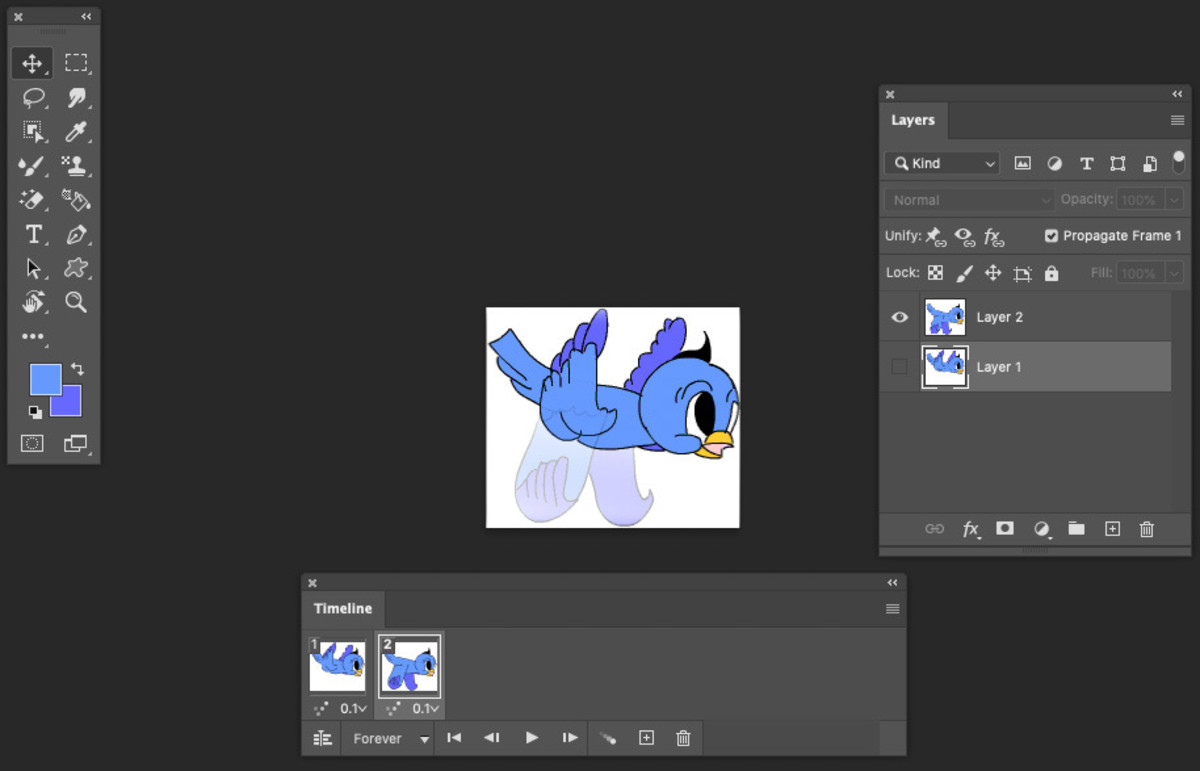
Making GIF animations is one of Photoshop’s most used features. A GIF animation is a collection of a minimum of two still images that are played repeatedly to create the appearance of movement. You can start with an image file and turn it into a GIF animation. my self
Stamp and Clone
Spot Healing Brush Tool (J)
If you’re looking to quickly fix small imperfections in your image, the Spot Healing Brush Tool is the way to go! Click on a spot of an object you want to fix, this tool allows you to quickly remove an area to be fixed and the Photoshop will automatically select the surrounding area to use as a source for the healing. This is a great way to quickly remove unwanted spots or small objects from your image without having to do a lot of manual selection.
Healing Brush Tool (J)
Photoshop Healing Brush Tool is used to remove unwanted objects, such as power lines, trees, wrinkles and poles, and blemishes from a photo. It is a quick, easy and accurate way to get rid of any imperfections in an image. If you want to replace something in your photo, the best way to do this is by using the healing brush tool. All you need to do is select the brush size, then you can use it in the areas of your photo where there are unwanted objects and all traces of them will be removed. To set the source sampling area, Position the pointer over an area in the image from which you want to take the sample and set the brush size then, by dragging your mouse around the image, you can blend the pixels that you have selected with the existing pixels. Each time you release the mouse button, the new pixels will be blended with the old ones.
Patch Tool (J)
Photoshop Patch Tool is a handy tool that lets you apply a patch to a selection. The patch is a collection of pixels that have been modified in some way. You can use the patch tool to add, delete, or rearrange pixels in the selection. Blending the patch tool is used to remove unwanted image elements. The content-aware option in the patch tool synthesizes nearby content for a seamless blend. You can make a selection other than the patch tool and drag selection throw the patch tool then get a result.
Content-Aware Move Tool (J)
The Photoshop Content-Aware Move Tool is a really handy feature that can be used to move objects around in a photo without having to use any manual editing. To use the Content-Aware Move Tool, first select the area you want to move and drag them to the desired location and also extend or rotate, then hit the return key to fix it.
Red Eye Tool (J)
The Red Eye Tool in Photoshop disposes of the red eye in the flash photos. Select the red section of the eye in your photo throw red eye tool then it will fix automatically.
Clone Stamp Tool (S)
If you’re looking to do some quick and easy retouching, the Photoshop clone stamp tool is a great option. With this tool, you can select an area of an image and then clone (copy) it to another area. This is helpful if you need to remove a small object from an image or if you want to copy a certain area of an image. To use the clone stamp tool, select it from the toolbox (it looks like a rubber stamp). Then, click on the area of the image that you want to clone. To clone the area, hold down the Alt key (Windows) or Option key (Mac) and click on the area release the Alt/Option key and the clone will be placed where you want to place the clone set the brush size and just left-click and drag.
Pattern Stamp Tool (S)
Pattern Stamp Tool is an exceptionally helpful instrument while making patterns. you can create your very own patterns, you can utilize them to give fascinating surfaces and backgrounds to your picture. This instrument permits you to make your own example stamps. You can fill the design in your picture utilizing this tool.
Brushes and Paints
Brush Tool (B)
The Photoshop Brush Tool is a powerful tool for creating custom brushes. It lets you create brushes by defining a series of points, or brush tips, on a path. You can then use these brushes to paint your document. To start using the Brush Tool, select it from the Tools palette. The Brush Tool’s default setting is “Soft Round.”how to change brush size, by clicking the right square bracket or left ( [ ] ) on keyboard. One of my all-time favorite Photoshop brushes is the all-free-download.com MegaPack. This brush pack includes over 2400 Photoshop brushes, making it one of the most comprehensive brush packs available. The brushes are high quality and cover a wide range of styles, making them perfect for any project. Another great brush pack is the grutbrushes.com MegaPack. This brush pack includes over 700 high quality Photoshop brushes, making it perfect for those who are looking for a more comprehensive brush pack. The brushes cover a wide range of styles and are perfect for any project. Besides the standard Photoshop brushes, many other sites offer a variety of additional brushes.
Pencil Tool (B)
The pencil tool can be used to create designs or lines in Photoshop, Click the Pencil Tool option in the Toolbar to use it and by default, the Pencil tool has hard edges. Then click and drag in your image to create lines and apply color to the pixels in the selected layer. The default tip size for the pencil tool is one pixel, as seen in the brush preset picker on the options bar. The tip size can be changed by clicking the thumbnail or hit the right square Bracket ( ] ) or left square bracket ( [ ) on keyboard.
Color Replacement Tool (B)
If you’re looking to change the color of an object in your image, the Photoshop Color Replacement tool is a great option. This tool allows you to select a color in your image and replace it with another color of your choosing. To use the Color Replacement tool, simply select it from the Tools palette. Then, use the mouse to click on the color you want to replace in your image. Next, choose the color you want to replace it with from the color picker. Finally, adjust the tolerance level to determine how closely the colors must match in order to be affected by the tool.
Mixer Brush Tool (B)
Photoshop Mixer Brush Tool is a great option! This brush allows you to blend the colors, and tones and control the amount of paint that is applied to your canvas, as well as the level of detail. To use the Mixer Brush Tool, simply select it from the toolbar and then adjust the settings to your liking. You can control the size of the brush, the amount of paint that is applied, and the level of detail. Once you’re happy with your settings, simply click and drag the brush across your canvas.
History Brush Tool (Y)
If you’re a fan of Photoshop, then you’re probably familiar with the History Brush Tool. you’ve made. The history brush is a tool that allows you to go back and forth between different edit stages of your image. This means that you can brush over certain areas to “undo” certain edits without affecting other edits you’ve made. Interestingly, the History Brush Tool has a long and storied history itself. It was first introduced in Photoshop 3.0 and has been a staple of the software ever since. However, it has undergone a few changes over the years. One of the most notable changes came in Photoshop CS6 when the History Brush Tool was significantly updated. Among other things, the new and improved tool featured a new interface.
Art History Brush Tool (Y)
The Art History Brush Tool can be used to paint textures, patterns, and borders onto your images. By using the different size and hardness of the brush tip, you can create a variety of textures and borders.
Eraser Tool (E)
Photoshop Eraser Tool is a handy tool that helps you remove unwanted objects, pixels and other elements from your photos. You can use it to clean up parts of your photos that you don’t want to keep or to remove elements that you’ve accidentally added. Select the Eraser Tool. Then, click on the area of the photo where you want to remove objects. The Eraser Tool will start working its magic, and will automatically remove any objects that are nearby. You can also use the Eraser Tool to remove specific pixels from your photo or to erase large areas of your photo at once.
Background Eraser Tool (E)
The Photoshop Background Eraser tool is one of the most used tools in Photoshop. It is a great way to clean up your background without having to go through the tedious process of deleting each and every pixel. The following steps will show you how to use the Background Eraser tool:
- Open the background you would like to erase.
- From the toolbar, choose the Background Eraser tool.
- Brush size adjustment
- Select the area of the background you would like to erase.
- Press the selected area to delete the background. However, the Background Eraser tool has two main drawbacks. First, it can be difficult to use, because it has a lot of settings. Second, it can be slow to work with.
Magic Eraser Tool (E)
Photoshop Magic Eraser Tool is a very handy tool that can be used to remove unwanted objects from images. The tool has a simple and easy to use interface and can be accessed by pressing the “Magic Eraser” button located in the toolbar. The Magic Eraser tool works by removing the pixels that are surrounding the object that you want to remove. To use the Magic Eraser tool, first fix the tolerance slider to adjust the level of tolerance. The Magic Eraser tool will then start to work its magic and will start to remove the object from the image.
Gradient Tool (G)
The Gradient Tool can be used to create linear or radial gradients in Photoshop. A linear gradient can be created by clicking and dragging the gradient tool along the desired path. Radial gradients can be created by clicking and dragging the gradient tool from the center of the gradient to the edge of the gradient.
- Make a shape in Photoshop
- With a select shape, go to the “Fill” box in the options bar at the top of the screen
- In the drop-down window, select the gradient tab
- Make new “Layers” on the right-hand side, on layer penal for your gradient
- Click the gradient editor settings box for the Gradient
- Choose from radial, linear, or freeform gradients option
- Double click the color squire at either end of the gradient bar to select the colors you wish to graduate between
- Click within your selection to apply the gradient
- Alternatively, draw a line with the gradient tool to define the length and angle of the gradient
- You can take more than 2 colors
Paint Bucket Tool (G)
If you’ve ever used Photoshop, then you know that the Paint Bucket tool is one of the most essential tools in the program. The Paint Bucket tool allows you to quickly and easily fill color in areas of a selection with color. If you can’t find the paint bucket tool, try clicking and holding the gradient tool to reveal other related tools. From there, you should be able to select the paint bucket tool or press “Shift G” Shortcut to fill color in selection:
- Command + Delete (Mac) | Control + Backspace (Windows) fills with the background color.
- Option + Delete (Mac) | Alt + Backspace (Windows) fills with Foreground color.
3D Material Drop Tool (G)
The Photoshop 3D Material Drop Tool lets you create realistic 3D materials by dropping a collection of objects onto a 3D surface. You can create materials from any object in Photoshop, including photos, videos, and artwork. To use the Material, Drop Tool, first select the object or objects you want to use as your source material. You can then drag and drop the object or objects onto the 3D surface. The Material Drop Tool automatically creates a collection of 3D materials based on the object or objects you’ve selected.
Blur Tool
The Blur tool is one of the most commonly used tools in Photoshop. It’s used to create a soft, hazy effect or to slightly blur an image. When used with a low opacity, the Blur tool can be used to blend colors and create a smooth transition between two colors. The Blur tool can also be used to remove unwanted details from an image.
Sharpen Tool
If you’re looking to sharpen your photos in Photoshop, the Sharpen tool is a great option. This tool allows you to selectively sharpen areas of your photo, which can be helpful if your photo is blurry in some areas but not others. Here’s a quick guide on how to use the Sharpen tool:
- First select the Sharpen tool from the Toolbar.
- In the options bar, choose the brush size and strength that you want to use.
- Paint over the areas of the photo that you want to sharpen.
- That’s it! You can continue to adjust the brush size.
Smudge Tool
The smudge tool is one of the most versatile tools in Photoshop. It can be used to create a variety of effects; the smudge tool functions similarly to dragging your finger through wet paint. The tool picks up the color of the location at which you click and then pushes that color through the stroke as you drag.
Pen and Path
Pen Tool
Pen Tool (P)
When it comes to Photoshop, there is one tool that is more important than any other: the pen tool. The pen tool allows you to create precise selections, masking, and paths. It is an essential tool for any Photoshop user, regardless of their level of experience. Photoshop Pen Tool is a new powerful feature that allows you to create vector illustrations. Now, this tool works with layers also, so you can create complex vector illustrations and logos throw Pen tool options path, shape, and pixels. It can be used to create straight lines, curved lines, or even freeform shapes. Simply click and drag your mouse to create a desired shape or selection. The degree of control and flexibility offered by the pen tool makes it an essential tool for any Photoshop user. Photoshop provides multiple Pen tools option for creative style:
Freeform Pen Tool Curvature Pen Tool Magnetic Pen Tool
You can save the path, go to your paths panel and search for another Work Path. Double tap on the Work Path layer to save and name it, also you can save the selection and load it.
Freeform Pen Tool (P)
The freeform pen allows you to create many different types of lines, paths and shapes within a single document. The Easiest Way to Draw Anything You Can Imagine. It also gives you the ability to modify the style and thickness of your strokes without leaving the tool’s settings menu. Essentially, using the freeform pen is like having your own set of artistic tools within Photoshop. you can freely draw any type of freeform curve you want. You can even change the angle at which your curves bend or straighten as you draw.
Curvature Pen Tool (P)
The curvature pen is a powerful way to create curved lines on your artwork. Simply select the curvature pen from the tool’s palette, then point and 2nd point then start line will come and make 3rd point then line will automatic be curved. This creates a curved line with any pressure you want- creating complex curves and shapes easily.
Add Anchor Point Tool
In Photoshop, the anchor point tool has worked. Just add a new point in the path or shape.
Delete Anchor Point Tool
If you want to delete any point on the path or shape, use the “Delete Anchor Point” tool and hit on the point that you want to delete.
Convert Point Tool
When you create a path using the pen tool, if you want to change it without adding or deleting anchor points, choose the “Convert Point Tool” and click on the pointer where you want to make the changes. When you click on an anchor point, the point arms will be open left and right. Then you can move any arm to carve the path easily.
Path Selection Tool (A)
Using the Pen tool in Photoshop is similar to using the move tool in Illustrator. Select and move any Pen tool’s path or shape.
Direct Selection Tool (A)
If you want to modify the vector shapes or paths, then you can use the “Direct Selection Tool” just like in Illustrator. If you click on the pointer, then you can select an individual anchor point in a path or shape and modify it.
Shapes Tool
Rectangle Tool (U)
You can create rectangular shapes using the Photoshop “Rectangle Tool.” If you create shapes, a new layer is automatically created for them, and you can use the Options bar to adjust tool settings like Fill, Stroke, Width, and Height, and add rounded corners to get the effect you want. You can also modify them. If you create pixel bases rectangularly, however, you must create a new layer for them as well as paths. If you create a rectangle shape (vector), then you can add and subtract shapes by holding the shift key for adding and holding alt/opt for subtracting. You can also use the pathfinder in the properties panel.
Ellipse Tool (U)
The Ellipse Tool in Photoshop may be used to make ellipse shapes. When you create shapes, a new layer is immediately produced for it, and you may alter it as well as change tool parameters like Fill, Stroke, Width, and Height using the Options bar. However, you need to establish a new layer as well as paths for pixel-based ellipses. If you create an ellipse shape (vector), then you can add and subtract shapes by holding the shift key for adding and holding alt/opt for subtracting. You can also use the pathfinder in the properties panel.
Triangle Tool (U)
You can create triangle shapes using the Photoshop " Triangle Tool." If you create shapes, a new layer is automatically created for them, and you can use the Options bar to adjust tool settings like Fill, Stroke, Width, and Height, and add rounded corners to get the effect you want. You can also modify them. If you create pixel bases triangle, however, you must create a new layer for them as well as paths. If you create a triangle shape (vector), then you can add and subtract shapes by holding the shift key for adding and holding alt/opt for subtracting. You can also use the pathfinder in the properties panel.
Polygon Tool (U)
You can create polygon shapes using the Photoshop " Polygon Tool." If you create shapes, a new layer is automatically created for them, and you can use the Options bar to adjust tool settings like Fill, Stroke, Width, and Height, and add rounded corners to get the effect and number of sides you want. You can also modify them. If you create pixel bases polygon, however, you must create a new layer for them as well as paths. If you create a polygon shape (vector), then you can add and subtract shapes by holding the shift key for adding and holding alt/opt for subtracting. You can also change the number of sides like (star) by the appearance in the properties panel.
Line Tool (U)
The " Line Tool" in Photoshop may be used to generate line shapes. When you construct a line, a new layer is immediately generated for it. You can then utilize the Options bar to change tool parameters, such as the stroke type and width, to acquire the effect.
Custom Shape Tool (U)
In Photoshop’s Tools panel, a selection of ready-to-use shapes is offered via the Custom Shape selector. Click and hold on to the icon for the shape tool that is presently visible to choose it. A fly-out menu displaying the additional shape tools is displayed when you click and hold on to the icon in the options bar. The next step after selecting the Custom Shape Tool is to confirm that we are drawing vector shapes and not paths or pixel-based shapes. The vector shapes are adaptable, editable, and resolution-independent. This means that we can scale and resize them as much as we like, and even print them at any size, while still maintaining the sharpness of their edges. Set the Tool Mode option in the Options Bar at the top of the screen to ensure that you are dealing with vector shapes. Hand Tool (H) Hand tool makes it easy for you to swiftly navigate the page and works similarly to a scroll bar, so you can get your job done quickly. Additionally, if you press and hold the spacebar while using another tool, that tool transforms into the Hand symbol tool, enabling simple page movement. Rotate View Tool (R) View Rotation Techniques: To display the compass, click and hold using the Rotate View Tool. Drag the image while continuing to press the mouse button to rotate the view clockwise or counterclockwise. The Rotate View tool is one of the most helpful minor functions in Photoshop I can think of, whether doing retouching, shading, or dodging and burning the image. Click the Reset View button in the Options menu to reverse your rotation.
Zoom In Zoom Out
Zoom Tool (Z) Photoshop zoom in or zoom out of a document. When you make use of the Zoom tool, each click on the area you want to zoom in or out in your image. The picture is enlarged or shrunk with each click. If you double-click on the zoom tool, the image view will be 100% or Ctrl + 1 on (windows) or cmd + 1 on (Mac).
Photoshop 2022 System Requirements
MAC
MacOS 10.13 or later 7 GB free HDD 8 GB RAM Intel Core 2 Duo or higher Compatible with Intel M1 Chips
Windows
Operating System: Windows XP/Vista/7/8/8.1/10 RAM: 8 GB Hard Disk: 5 GB Processor: Intel Dual Core or higher processor
Operating system: Windows 10, MacOS, and iPad Available in: 26 languages Written in C++ Software link: www.adobe.com/products/photoshop.html
Photoshop Alternative Free
photopea.com canva.com pixlr.com sumo.app krita.org
© 2022 Sohail Ahmed