In any case, there is no need for you to worry because the process of bulk deleting posts in a Facebook page is still possible! So let’s not delay things further and get straight to the point. After all, the primary purpose of this article is to help you find out how to bulk delete posts in a Facebook page.
Deleting Posts in Bulk via Creator Studio
Creator Studio is basically Facebook’s content management system for creators (page owners). As long as you own a Facebook page, you can access Creator Studio without having to create a separate account. It is already tied up to your account and readily accessible for your convenience. If you are familiar with YouTube Studio, this is Facebook’s version of that. What’s great about managing content in Creator Studio is that it is centralized, thereby allowing you to manage posts, stories, messages and videos from all of your pages in just one place. Simply put, it makes your life easier especially if you are managing multiple pages. As for bulk post deletion, you can even bulk delete posts from multiple Facebook pages all at the same time! To get started, you’ll need to access your Facebook via Web first so it is recommended that you follow the steps below while you’re on your laptop or home computer.
Getting Started
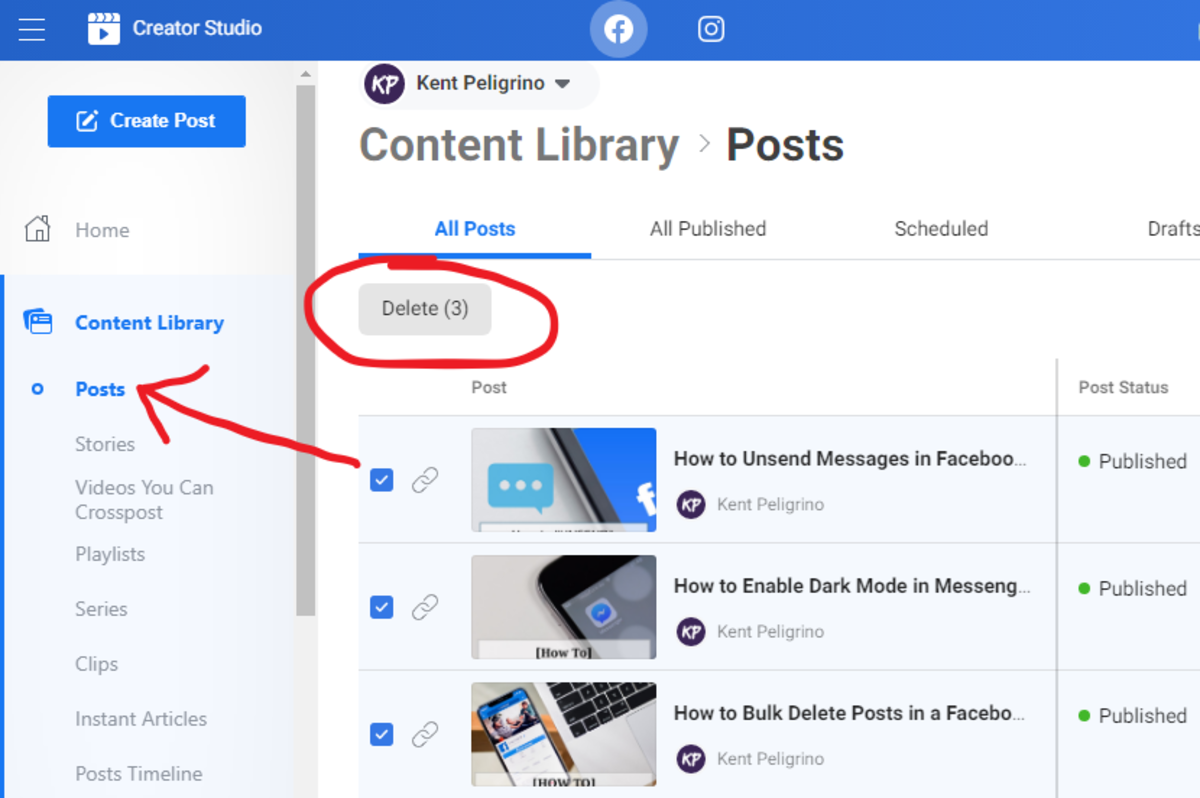
Given that you are already logged in to your Facebook account, the first thing you need to do is go to Creator Studio. The fastest way to do this is by directly opening Creator Studio from your web browser. Simply type facebook.com/creatorstudio on your browser’s address bar and press Enter. Another option would be to access it via Publishing Tools in one of your Facebook pages. Just go to Facebook like usual, select the page that you want to view and once you’re on it, go to Manage Page at the left panel and select Publishing Tools. Under Publishing Tools, go to Tools then click Creator Studio. It should open Creator Studio in a new tab. Once you are on Creator Studio, there should be a whole selection of content management tools on the left pane. You simply need to go to the Content Library which is right under Home. Under the Content Library, go to Posts. By default, it should display all posts from all of your pages. So if you want to select a specific page, simply go the page selection menu which is just right above the list of displayed posts. To view the page you want, simply uncheck the rest of the pages that are selected by default then click View. The list will then be updated to only show posts from your selected page. Now, on to the fun part! Select all posts that you wish to delete. Right now, there is no multi-select tool for posts so you have to select posts individually. Use the scroll bar to scroll through the list. You can also sort out your selection by post type and by date. Once you’ve selected all the posts that you wish to delete, the Delete button will automatically appear. All that’s left for you to do is click the Delete button to confirm the said action. A confirmation display message should appear. Just click Delete again to confirm. That’s it! Just be careful when selecting posts to delete because once completed, the said action could no longer be undone. In the old method, there’s a limit to how many posts you can bulk delete but in Creator Studio, you can delete more than 25 posts at once. This improvement to the bulk delete feature is more efficient especially if you have a lot of posts to delete and manage. So there you have it! With the help of Creator Studio, managing your Facebook page posts and deleting them in bulk is no longer a hassle! This content is accurate and true to the best of the author’s knowledge and is not meant to substitute for formal and individualized advice from a qualified professional. © 2020 Kent Peligrino