You are probably here to learn more about Mac shortcuts or a tool that mirrors the snippet tool that you find on Windows operating systems. If so, you are in luck because these four methods that are covered require no software downloads and are easy to navigate through.
1. Capture an Image From Part of the Screen
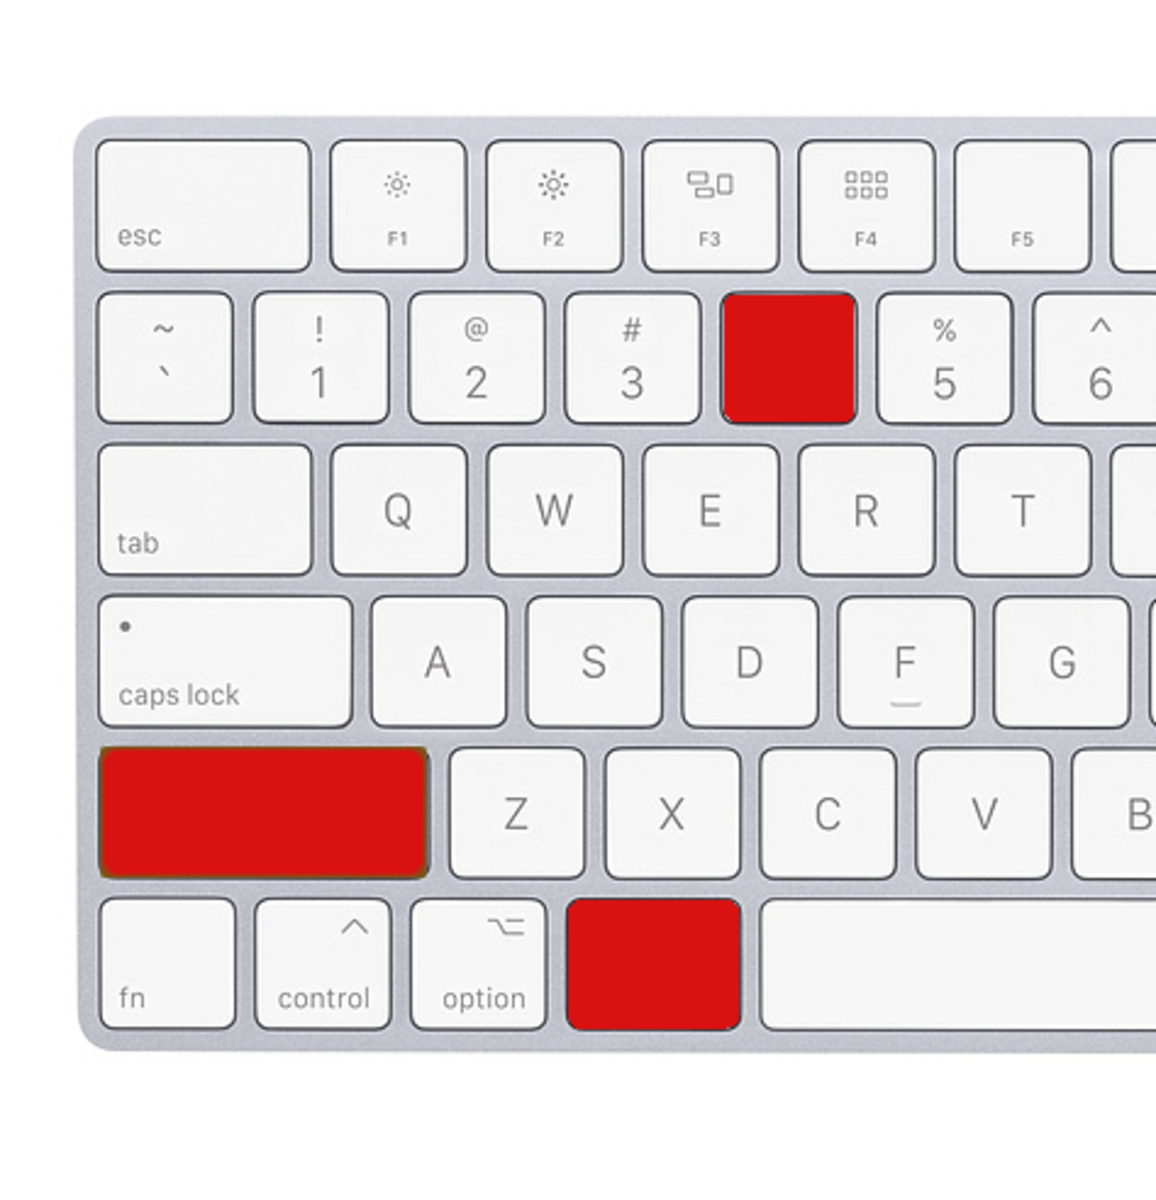
The first type of screen capture that I discuss here is the partial screen capture. Like the snippet tool, this function allows you to dictate exactly what part of your screen to capture. The shortcut that activates this operation is found in bold below. Shift + Command + 4 After using the shortcut above, the cursor should turn into crosshairs. Now you can position these crosshairs where you would like to start the snipping process and trace the portion of the screen that you would like to capture. If you decide at this point that a full screenshot is appropriate, then go ahead and select the whole thing. An example of a capture of a portion of a screen is shown in the illustration below.
Crosshairs Activated and Ready to Select an Area
As you can see in the illustration below the selection was made with the cursor. Created by 10 Tampa Bay
Partial Screen Area Is Selected
Once your ready to accept the area that has been selected with the cursor, you can release the drag on the mouse. After doing so, the captured section will display in the lower right hand corner of the screen. Created by 10 Tampa Bay To save the capture, start by clicking on it. Next, select the icon on the menu with the arrow pointing up. Select add to photos or another program that you would like to used to save the capture.
2. Capture an Image of a Menu/Window
If you need to capture an image from a window that you are working in such as a program or popup of a photo or graph, this function will be well suited for you. The shortcut that activates this operation and found below. Shift + Command + 4 + Space Bar Before using the shortcut you must open the window or menu that you wish to capture as an image. After doing so, use the shortcut and the cursor will change into a camera icon. Clicking on a window will allow you to select it. This can be seen in the image below. After the window is selected, it can be clicked again to capture an image. The end of the process is shown in the illustration below. The image is displayed in the lower right corner of the page. Just as stated earlier in this text, the image can be saved to a photo or sent to another program by clicking on it can choose the appropriate selections.
3. Capture an Image From the Whole Screen
Capturing an image from the entire screen is also an option. This was always the traditional way on PCs. To complete this operation just use the following shortcut. Shift + Command + 3 The end result will be the image that you selected will show up in the lower right of your screen. Just as it is stated above, you can save that image or send it to a different program by clicking on it and selecting the appropriate options.
4. Capture an Image From the Whole Screen From the Screen Recorder
Capturing a full-screen image can also be completed with an extra step from the screen record operation. Simply use the following shortcut to get into screen record mode. Shift + Command + 5 When in this screen recording mode a toolbar for screen recording offers a full screenshot option. First, click on the capture entire screen option on the left side of the toolbar. Lastly, click on the capture button on the far right of the toolbar. The result will be a full-screen capture that will show up in the bottom right corner of the screen that can be clicked on and saved to photos or sent to another program. This content is accurate and true to the best of the author’s knowledge and is not meant to substitute for formal and individualized advice from a qualified professional. © 2022 Joshua Crowder