Files are transferred through a single control channel in SFTP. It requires authentication and runs on port 22. In SFTP, the SSH shell provides encryption that helps protect usernames, passwords, and other personal data transferred through SFTP. In this how-to guide, we will learn to create SFTP users for web server document root.
Step 1 – Installing SSH (Secure Shell)
SFTP is a very secure file transfer protocol because of the encryption that SSH provides for the data as it is transferred over the network. SSH is mainly installed on Linux distributions by default, but if it is not pre-installed in your system, then you can use the below-given command to install it:
If already installed, the command will upgrade OpenSSH packages.
Step 2 – Configuring SSH to use the SFTP Server Code
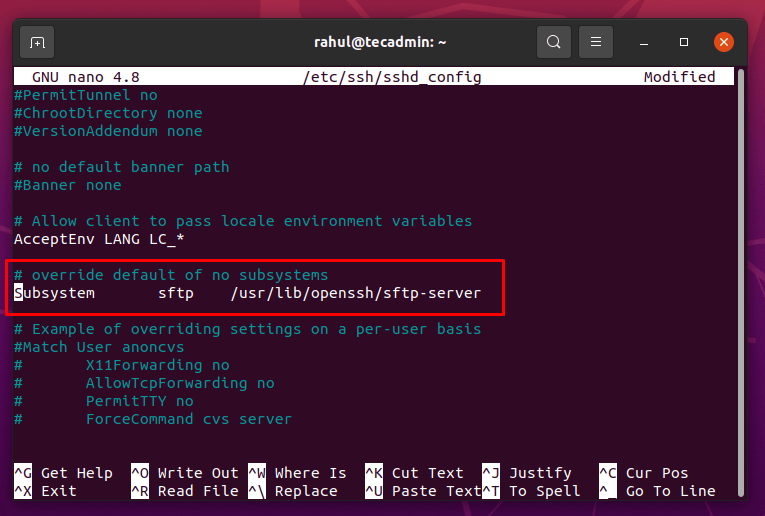
Now open the configuration file of SSH in a text editor to modify it for SFTP server code. Here we will use the nano editor to edit the configuration file. Locate the line starting from “Subsystem sftp”.
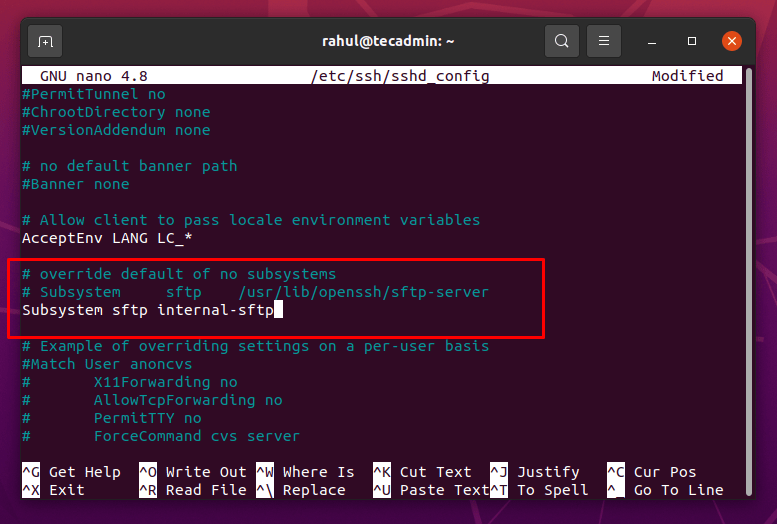
Comment the line by adding # at the start of the line and write the following line after this line as shown in the screenshot given below:
The SSHD will use the SFTP server code instead of running the SFTP server by changing the above line. Once you have changed the configuration file, save the file and exit from it using the keyboard shortcut keys CTRL+S and CTRL+X. After changes, we need to restart the SSHD daemon to let the changes work.
Step 3 – Creating a User(SFTP User)
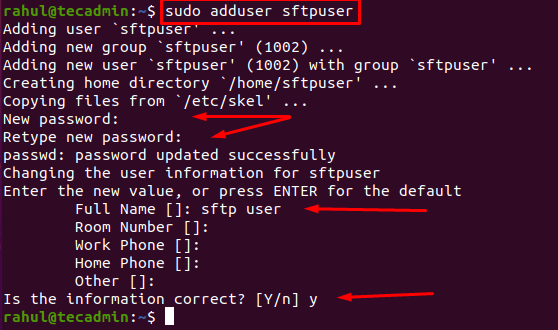
It is an excellent practice to create a new user that only has SFTP access to the document root. It is not recommended to add a user with Sudo privileges to the webserver document root. Create a new user using the adduser command: The terminal will ask for a couple of things like setting the password, and user information. It will also ask for a few other details, so either leave them empty or provide the proper information.
A new user with the name of sftpuser is successfully created.
Step 4 – Creating Match User Directive in the SSH configuration file
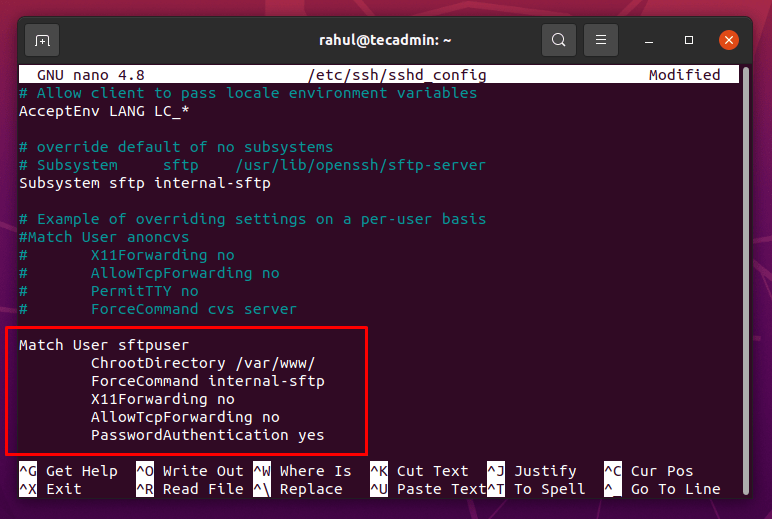
Now we will restrict this user to the document root and we will also disable the user’s access to SSH so that the user will log in through SFTP. To restrict the user’s access, open up the configuration file of SSH in any text editor: Now go to the end of the file and add the following content in the “sshd_config” configuration file: Make sure to replace the “sftpuser” username with the username you set.
Once the above content is added to the SSH configuration file, save and exit using CTRL+S and CTRL+X shortcut keys. To check the syntax and verify if everything went well, you can execute the command: If no error occurred, we could reload the SSH service for the changes to work.
Step 5 – Adding SFTP User to www-data Group
Now we will add the user to the www-data group by executing the following command: On a successful run, no output will be displayed.
Step 6 – Setting Document Root Directory Permission
Please follow the subsequent instructions very carefully as SFTP is very strict regarding chroot directory permissions. Congratulations! your new SFTP user has been created and added to the webserver document root. You can now log in to SFTP.
Conclusion
In this how-to guide, we have learned how to install and configure SSH for using the SFTP server code. After that, we created a new user, restricted them to document root, and disabled their SSH access. Then we added the user to the webserver document root to allow the user to read, write and execute files in the document root.