Loading screens Screen transitions The end of cut scenes Death / Game Over scenes The creation of some special effects Menus In many other situations, there are tons of examples.
Almost every game designer is going to need to fade to and from a black screen at one point or another. There are some fairly technical ways to achieve this effect, but the easiest by far involves a few snippets of code and a big ol’ black square.
Method 1: Attach to Camera
To create your fade-to-black effect you’re going to need a rectangular, black image that is at least as large as your screen resolution. The square itself can be any size you like, as long as it is a flat, continuous black. You can create this one of two ways:
In Unity, go to Assets on the top menu, then Create, then down to Sprites, and over to Square. This will create a small, white square GameObject. Change the Color in the Sprite Renderer to Black. Voila. You can also create one in a graphics program of your choosing and import it into Unity as a .png. Make a new image, set your paint color to black, and use the Fill tool to turn the entire image black. Piece of cake.
Regardless of how you get it done, you now have a GameObject that looks entirely black. Set its Sorting Layer to something above every other GameObject so it will always appear on top. You can now stretch the GameObject to fit your screen, making it as large as - or slightly larger than—your camera, covering everything the camera sees when it is active. You can also child it to your camera so it follows the camera around, allowing you to black out the camera’s viewing area at will. This is one way to do it—but I, personally, prefer a different method: Using a UI Canvas to fit your square to the screen.
Method 2: Use a UI Canvas
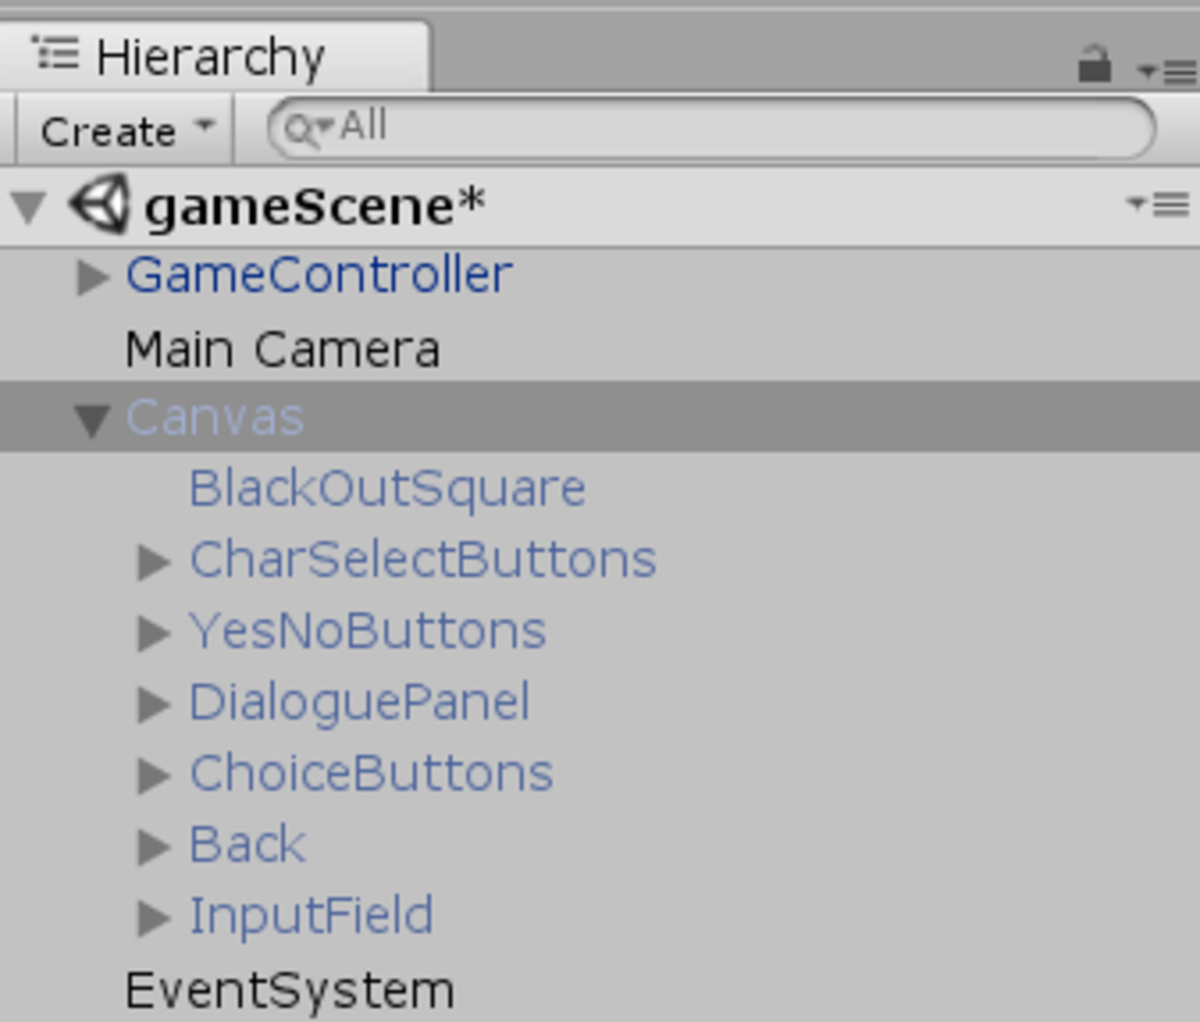
Similar to fade out screens, most video games are going to have a User Interface (UI) Canvas of some kind that will allow players to access menus and view important information while the game is in play. UI Canvases will automatically place all of your UI elements on a layer above the rest of your game, and will follow your game’s main camera wherever it goes. Why is this method better? One reason: It allows you to black out UI elements alongside the rest of the screen. Child elements beneath a parent are ordered by layer according to how far down they are in the hierarchy. In the screenshot above you’ll see that ‘BlackOutSquare’ is at the top of the Canvas parent/child Hierarchy, which means everything that comes after it will still appear, because they are on higher layers comparative to the BlackOutSquare. This allows players to still see menus when the black square is fading in… … and, by the same logic, it allows you to black out UI elements you would prefer not to see. Just put any elements you want to fade out above the BlackOutSquare in the Hierarchy and the square will cover them whenever it’s active. This is an easy way to smother things you don’t want to see without having to resort to code. Go into BlackOutSquare’s Color setting and change the Alpha (A) to 0. This will completely fade out BlackOutSquare in preparation for the next step.
The Coding
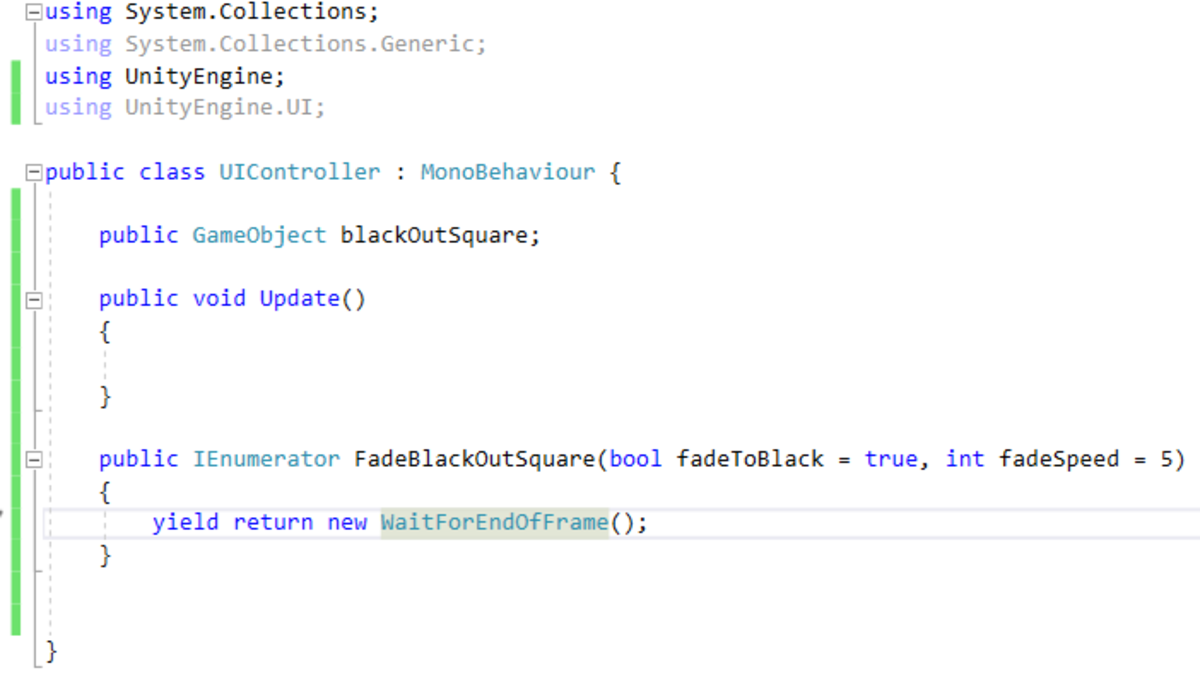
Now that you have your fade-to-black image in place you need some code to make it appear and disappear. There are a few ways to get the job done, though in this case we’re going to use Coroutines. Coroutines are functions that act as timers, allowing you to progress through a series of timed steps and determine just how long a function will take to complete before it terminates. Create a new script for the purpose of coding your fade-to-black function. (If you opted for the UI Canvas method you’ll probably use this same script for a lot of UI-related tasks, so I suggest a name that is fairly generic. UIController, maybe? Up to you.) Now you need to create a few variables and functions: First thing’s first: You need to add UnityEngine.UI to your list of Namespaces at the top of your script. Namespaces are collections of classes that grant you access to a variety of different functions. C# cannot normally parse UI elements like Images in scripts, so adding UnityEngine.UI is a necessity for manipulating your UI. The public GameObject at the top, blackOutSquare, is the reference slot for your fade-to-black GameObject. Go back into Unity once you’ve created the variable and drop the square you’ve created into the Inspector. Now you can call on, and manipulate, the square’s attributes. Easy peasy. The Coroutine FadeBlackOutSquare is a little more complex, so we’ll break it down a bit:
First, in this example, we’ve opted to create one function rather than two. You could create two functions to get this done - one for fading the square in, one for fading it back out, but you’ll wind up dealing with less code if you just make it a single Coroutine. Next, we have the bool fadeToBlack = true. In this case if the function is called and fadeToBlack is true, blackOutSquare will become fully opaque, blacking out the screen. If you call the function and set fadeToBlack to false instead, blackOutSquare will fade out and reveal the GameObjects beneath. This bool is what allows us to turn two functions into one. We’ve set it to true by default, so if you don’t tell the code otherwise when calling the Coroutine Unity will assume you’re trying to fade to black. Next up is int fadeSpeed = 5. This will allow us to control just how quickly blackOutSquare will appear or disappear. By default fadeSpeed is 5, but you can change it to any number you like when calling the Coroutine. Last, we have yield return new WaitForEndOfFrame();. Coroutines need some measure of time present to avoid errors, so this is mainly in place to avoid errors. We’ll get rid of it in a minute, so you don’t need to put it there yourself.
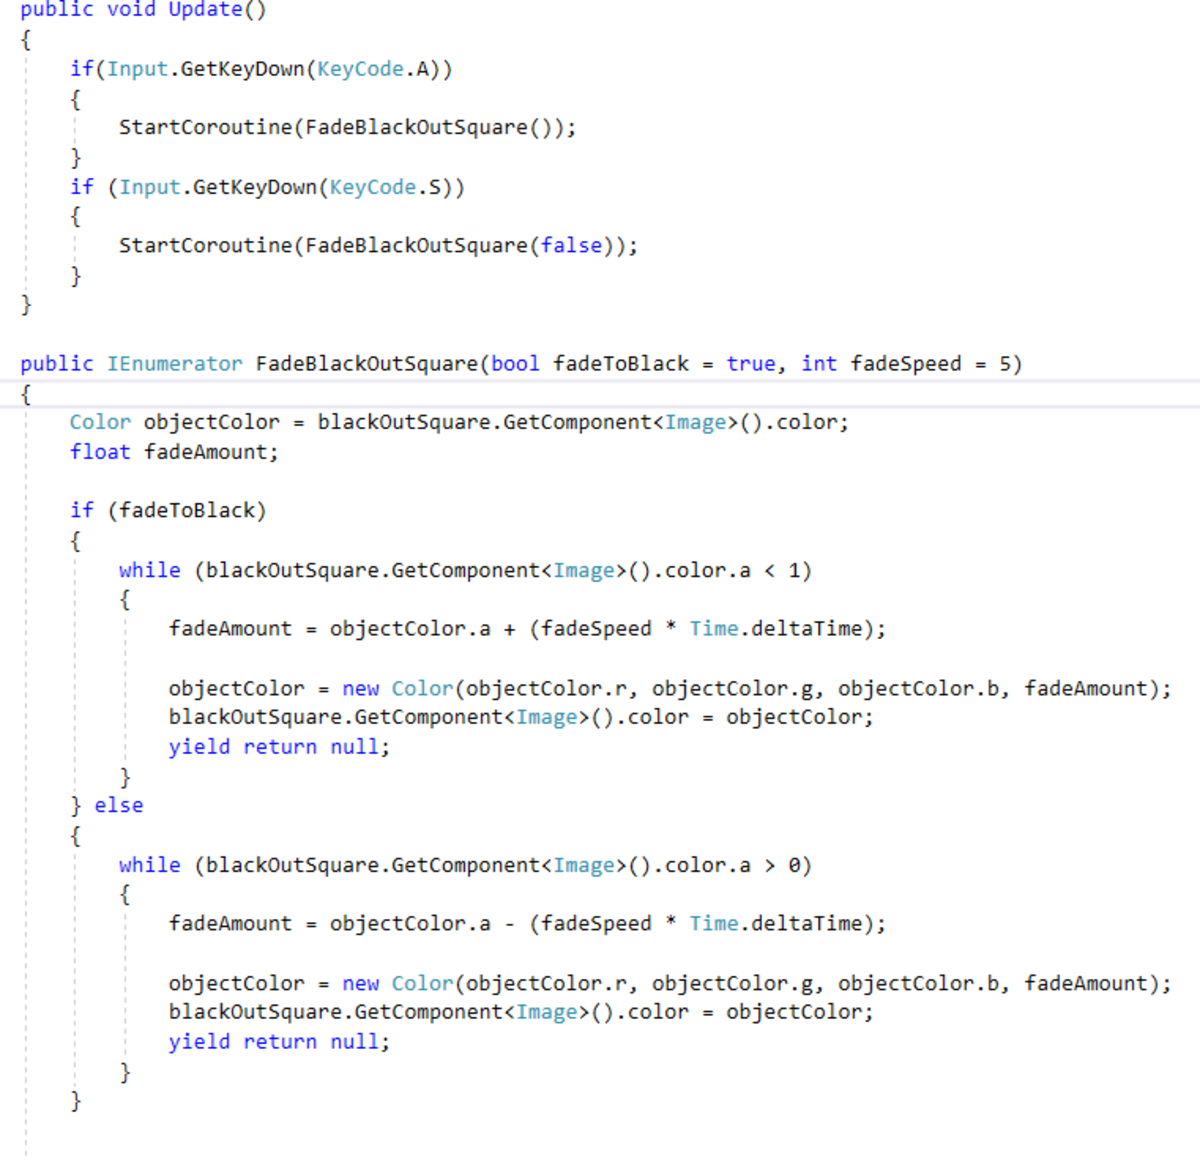
Now for the heavy lifting. To fade in blackOutSquare we need to code our Coroutine like so: Because Unity does not allow for the direct manipulation of the four variables that make up a GameObject’s color (r, g, b, a), we need to change the entire Color at once. To that end, we grab the blackOutSquare’s Color attributes as a new Color, objectColor, and use it going forward. We also need a float, in this case fadeAmount, that will help us calculate how much the GameObject’s opacity will change on each frame. Nest everything in a fadeToBlack bool, then create a while() statement. This while() will tell Unity to continue looping through this code until blackOutSquare’s Alpha is greater than 1—which is to say, fully visible. Then we calculate fadeAmount - the current Alpha of objectColor, plus a modifier that adjusts the speed of the fade based on the passage of time and the fadeSpeed number - and plug that number into objectColor as the new Alpha. The other three objectColor attributes don’t need to change, so leave them as objectColor.r, objectColor.g, and objectColor.b. Almost done. Next, we need to change blackOutSquare’s color to match that of objectColor, easily done, and put in a command for the Coroutine to yield return null. This tells the Coroutine to not progress any further. When yield return null is included in a while() statement it basically just halts everything until the while() statement condition is satisfied. In this case, once the object is opaque, the while() ends. Now you’re set up for fading to black. Huzzah! How about fading away from black? Fortunately, that is a simple case of copy-and-paste. Take everything inside if(fadeToBlack) and set it after the else statement at the bottom. Then change the while() condition from < 1 to > 0 and the fadeAmount calculation from addition to subtraction. This tells Unity to move blackOutSquare’s Alpha towards zero, stopping only when it reaches zero. Now your GameObject is invisible again. Double huzzah! Throw in some if(Input) statements in your Update() function and you get something like this: Assuming you’ve done everything correctly, when you hit the A button on your keyboard while the game is active your BlackOutSquare GameObject will appear. Hit S and it will disappear again. You have a successful fade to black function! Congrats! You’ll probably want some bools to prevent errors if you use this in a game setting, of course—and players shouldn’t be able to access fade to black functionality from their keyboards—but this approach will get you started on making proper screen transition sequences for your game. One final note regarding Coroutines. You’ll notice in the if(Input) statements that the function calls are nested inside StartCoroutine() statements. Though you won’t receive an error if you call on a Coroutine without using StartCoroutine(), the Coroutine will not start if you don’t include that extra bit of code. So if you can’t get your GameObject to appear and disappear, that might be why. © 2020 Matt Bird