Before We Start
Before begin your work:
Running Ubuntu 20.04 system with sudo privileges shell access. Complete initial server setup instructions A domain name registered and pointed to your server’s public IP address. For this tutorial, we use webhost.tecadmin.net, which is pointed to our server.
Step 1 — Installing Apache
Apache packages are available under the default software repositories on Ubunts. You can easily install it using the conventional package management tool. First of all, update the local package index to reflect the latest upstream changes. Then install Apache2 web server. After the confirmation, apt will install Apache and other required dependencies on your system.
Step 2 — Test Your Web Server
Once the installation finished, Apache service will automatically start on your Ubuntu system. You can find the Apache service status by running the following command: Sample output: The result status like “Active: active (running)” means Apache service have started successfully. However, the best way to test web server, request a page from Apache in web browser.
You will see the default Apache landing page. It means the Apache web server is running properly on your system.
Step 3 — Create A Virtual Host
With the help of virtual hosts, you can host more than one domain from a single server. A virtual host encapsulate the configuration of a domain to it. We will set up a virtual host with a sub-domain called webhost.tecamin.net, but you should replace this with your own domain name. Let’s start with a directory for our domain as follows: Next, create a sample index.html page to host on this subdomain. Edit this file in your favorite text editor like vim or nano: Add the following sample HTML content:
Save file and close it. With the newly installed Apache server, you will see a default virtual host configuration file located at etc/apache2/sites-available/000-default.conf. But this is an good habbit to create seperate configuration file for each virtual host. So create a new virtual host file as /etc/apache2/sites-available/webhost.tecadmin.net.conf: Add the following configuration to virtual host file. Make sure to change the proper ServerAdmin email address, Servername to your domain name. You can also include ServerAlias to add more domain or subdomains. Then set correct DocumentRoot as created above.
Save file and close it. By default Apache reads virtual host configuration files under /etc/apache2/sites-available directory. Use a2ensite tool to enable this virtual host: The above command will create a symbolic link webhost.tecadmin.net.conf file to sites-available directory. Once done, run the below command to verify the configuration files: You should see the following output: Next, Restart Apache service to apply your changes: Apache is ready to serve your content on your configured domain name. You can test this by navigating to http://webhost.tecadmin.net,
Step 4 — Configure Let’s Encrypt SSL
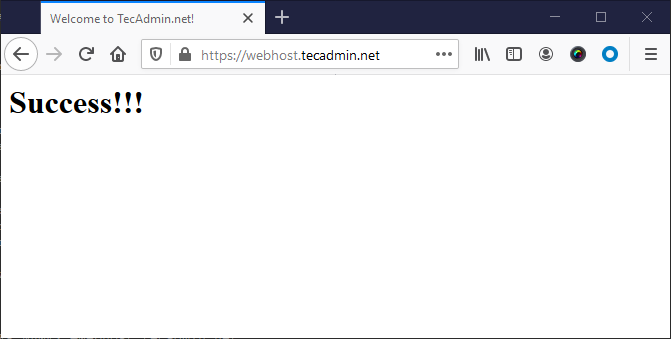
We use Let’s encrypt SSL certificate to secure website on Apache web server. Certbot is the command line utility to work with Let’s encrypt certificates. Run the following command to install certbot binary: This will install all the required packages for the certbot. Once the installation process finished. Run the below command to request let’s encrypt certificate authority to issue certificate for our domain webhost.tecadmin.net. You can add multiple domains or subdomains using separate “-d” parameters. Wizard will ask your email address to send your updates. Then accept Terms of Service to continue. Below is the complete logs of command: You have successfully configured you domain with SSL certificate. Now, you can access your domain over https protocol as shown in the screenshot below:
Step 5 — Adjust Firewall Rules
You can use the service name like “http” or “https” to allow in FirewallD. To open HTTP and HTTPS port in FirewallD run the below commands: Once you add the rules, reload changes using the following command.
Step 6 — Manage Apache Service
Now, you have your Apache web server up and running, let’s go with the Apache service management commands. To stop Apache web server, type: To start Apache web server (if stopped), type: To restart (stop and then start) Apache service, type: Instead of stop then start a running server, use reload option to apply configuration file changes without dropping current connections. But this will not read any new configuration file: To disable Apache service to auto start on system boot, type: To enable Apache service to auto start on system boot, type:
Conclusion
The Apache web server is running on your Ubuntu 20.04 LTS operating system.