Useful tutorial:
How to Install Visual Studio Code on Ubuntu
Prerequisites
Login to the Ubuntu system with sudo privileged account.
Install Mono on Ubuntu
First of all, install some required packages and import GPG key to your system. You need to add Apt repository provide by the official project team. Use one of the following commands to add Mono repository to your system based on Ubuntu version. Once the repository is added. Update the apt cache and install Mono packages on your Ubuntu system. The mono-devel package is used to compile code. The mono-complete package is used to install everything on the system.
Check Mono Version
Once the installation has finished on your system. Let’s check the installed Mono version using the following command. Output:
Run Example with Mono
As you have installed Mono on your Ubuntu system. Create a sample c# program to run with Mono. Create a Welcome.cs file and edit in your favorite text editor. Add below value to file.
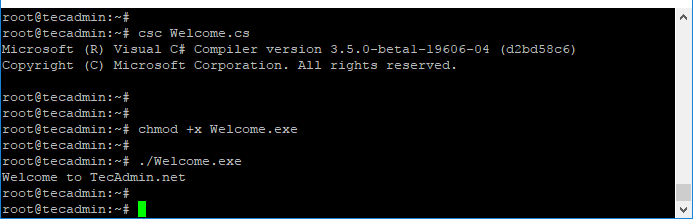
Save file and close it. Then compile the c# program with the c# compiler using below command. Once the compilation finished successfully, it will create a exe file in the local directory with the same name as script. In this case a Welcome.exe file is generated in my local directory. Set the exectue permission and then run the program You will see the output like below screenshot:
All done, You have successfully installed Mono on your Ubuntu system. Next you may requried to install Visual Studio Code on Ubuntu.