Like you have a group of computers in a remote location. Now you need to access those computers as a LAN network in your system. Also, you need all data should be encrypted during transfer between computers. The solution is a VPN. You can use a VPN network to connect two remote location systems with each other as they are on the same LAN. This tutorial will help you to install and configure the OpenVPN server on Ubuntu, Debian, and Linux Mint systems.
Step 1 – Prerequisites
Login to your Ubuntu system using SSH. Now update system’s apt cache and update your system packages to latest versions.
Step 2 – Install OpenVPN Server
Now, Install the OpenVPN package by typing below command. Also, install easy-rsa packages for managing SSL certificates required for data encryption between server and client. Copy the sample configuration file for OpenVPN to /etc/openvpn/server.conf file. This will be used as an OpenVPN server configuration file.
Step 3 – Configure OpenVPN Server
Edit the OpenVPN server configuration file in your favorite text editor. Remove the “;” to uncomment lines or add new lines for the following entries in the configuration file. The above settings will allow VPN connection between systems. But they will not direct the client’s internet traffic through VPN. Also, uncomment the dhcp-option values.
Step 4 – Update Network Configuration
Do some network settings to allow users to access the server on the same network of OpenVPN servers. First, Allow IP forwarding on the server by executing the below commands to set net.ipv4.ip_forward value to 1 in /etc/sysctl.conf file. Masquerade the internet traffic coming from the VPN network (10.8.0.0/24) to systems local network interface (eth0). Where 10.8.0.0 is my VPN network and eth0 is the network interface of my system.
Step 5 – Setup Certificate Authority
OpenVPN provides secure VPN service using TLS/SSL encryption of traffic between server and client. For this, you need to issue trusted certificates for servers and clients to work. To issue certificates you need to configure Certificate Authority on your system. Let’s create a directory for certificate authority using make-cadir command. This command also initializes the directory with the required files. Edit vars file in your favorite text editor. and update the below values as required. These values will be used as default values to issues the certificates for servers and clients. You can also overwrite these values during certificate creation. Load the values in system environment. Now use ./clean-all to remove exiting keys and then run ./build-ca to build CA certificates under /etc/openvpn/openvpn-ca/ directory. Sample output of above command: Now your system is ready as Certificate Authority to issue the certificates.
Step 6 – Generate Server Certificate Files
Firstly create the certificates for the OpenVPN server using the ./build-key-server command followed by keyword server to generate certificates for the server. This will create required certificates, key file under keys directory. Sample output of above command: Now generate a strong Diffie-Hellman key to use for the key exchange using the command. This command may take some time to complete. After that generate an HMAC signature to make more secure TLS integrity verification capabilities of the server. After creating all files, copy them to /etc/openvpn directory.
Step 7 – Start OpenVPN Service
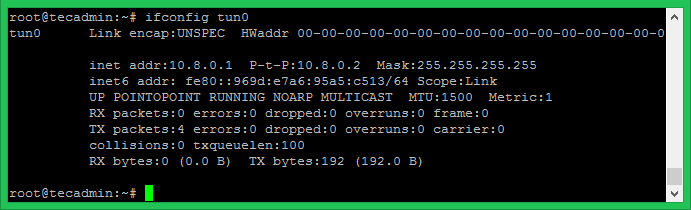
OpenVPN server is ready now. Let’s start the service using the systemctl command. Also, Check the status of service. On the successful start of service, you will see results like below. OpenVPN will create a network interface name tun0. Execute the below command to view the IP assigned to the interface. Mostly it assigns the first IP of the network defined in server.conf file.
Step 8 – Generate Client Configuration
You OpenVPN server is ready to use. Now generate the client configuration files including the private key, certificates. I have made this process easier for you to generate any number of configurations files using a simple script. Follow the below steps to generate configuration files. Make sure to use correct directory structure. Create a shell script file as below. copy the below content. Update the OPENVPN_SERVER variable with the correct OpenVPN server ip address and save it.
Set the execute permission on the newly created script. Now use this script to generate configuration file for the VPN clients including certificates and keys. You need to pass client name as command line parameter. Press enter for the default values of the certificate. At the end, it will prompt for the sign the certificate and commit. Press y for both inputs. The above script will create client configuration file under /etc/openvpn/clients/ directory with client name with .ovpn extension as shows in last line of output. Use this file to connect from remote systems.
Step 9 – Connect VPN from Clients
You need the configuration file generated from above
Windows Clients
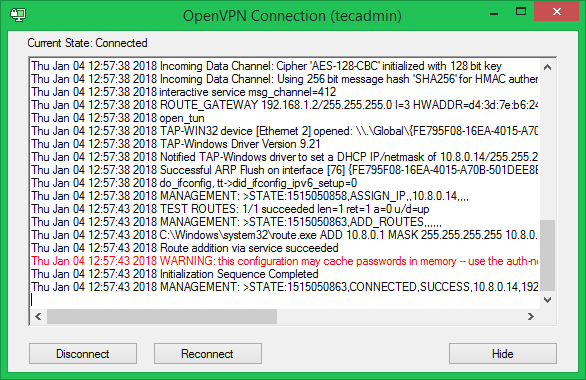
Download OpenVPN GUI client software from its official download page and install on your system. Now copy the given .ovpn file under c:\Program Files\OpenVPN\config file\ directory. Now launch Openvpn GUI client and connect. On successful connection you will a green icon in right-bottom notifications. You can view status by rigth click on icon.
Linux Clients
On Linux clients, First, you need to install OpenVPN packages. After that use the following command to connect to the OpenVPN server using the given client configuration file. After successfull connection OpenVPN will assign an IP address to your system. Use following command to check assigned IP address. [output]