This tutorial help you to install and configure Puppet master and agent nodes on Ubuntu 20.04 Linux systems.
Prerequisites
You must have:
Two or more running Ubuntu 20.04 systems, one for master and other clients. Shell access to all systems with sudo privileged account. All systems must be connected with each other over private or public network.
Step 1 – Configure Hosts
Puppet master and client nodes uses hostnames to communicate with each other. So its good to start with assigning a unique hostname for each node.
- Login to the master and each client node one by one and edit /etc/hosts file:
- Add the following entries at the end of each hosts file: Here:
10.132.14.239 is the IP address of the master node. 10.132.14.240 is the IP address of the client node. 10.132.14.242 is the IP address of another client node. Add more client nodes, you required
Save your file and close it. To save file with nano editor press Ctrl + X and then type Y and press Enter to save the change and close file.
Step 2 – Install Puppet Server (Master Node)
Now, login to the Master node with the shell access 3. Install latest Puppet debian package to configure PPA on the master node: 4. Once you added the PPA, update Apt cache and install the Puppet server with the following command: 5. After successfully installation of all the Puppet packages. Edit the puppet server file by using: The default puppet server file configured to use 2GB of memory. In case your server doesn’t have enough memory. Reduce the memory size to 1GB or any other value: Save you changes and close puppetserver file. To save file with nano editor press Ctrl + X and then type Y to save the changes. 6. Next, start the Puppet service and set it to auto-start on system boot: 7. Once service is started, verify the service status with: You will see the service status as running. Now, start with the configuration of all client node.
Step 3 – Install Puppet Agent (Client Node)
First of all, make sure you already have updated hosts file entries defines in step 1 in all client nodes. 8. Now, download and install latest Puppet debian package to configure PPA on your client node: 9. Once you configured the PPA, Install the Puppet agent package on all client servers. 10. Once the packages installation finished. Edit the Puppet configuration file: Add the following entries to the end of the Puppet configuration file to define the Puppet master node details: Save your file and close it. 11. Next, start the Puppet agent service on all the client nodes and set it to auto-start on system boot: 12. Once done, verify the Puppet agent service is running properly: You should see a running status on all the agent systems
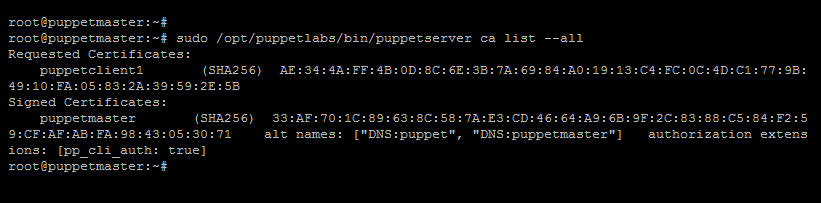
Step 4 – Sign the Puppet Agent Certificates
Your have done with the configuration’s. Now, login to the Puppet master node and run the following command to list all the available certificates:
Next, sign all the clients certificates using:
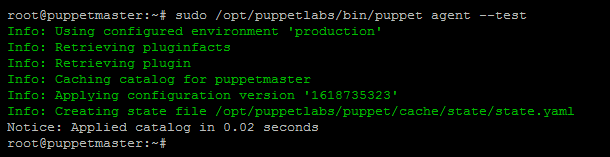
Finally, test the communication between Puppet master and client nodes using the following command.
Conclusion
That’s it. You have successfully installed Puppet on Ubuntu 20.04 system. This tutorial describes you to install Puppet on master node as well as on a client node. You can also visit the official documentation for more about Puppet server node configuration and client node configuration on