This tutorial will give you some ideas on how to start making something that works pretty well. This could mean that the final accuracy of your model is low or that the gloves only work some of the time. There are also three other modules besides pythonserialmlgloves1.1, including the mlgloves1.1 containing the machine learning model and Arduino code, so that this tutorial will be separated into a series of three tutorials. If you are willing to delve into this topic in greater detail, then without further delay. Here is how to make the gloves.
Required Items
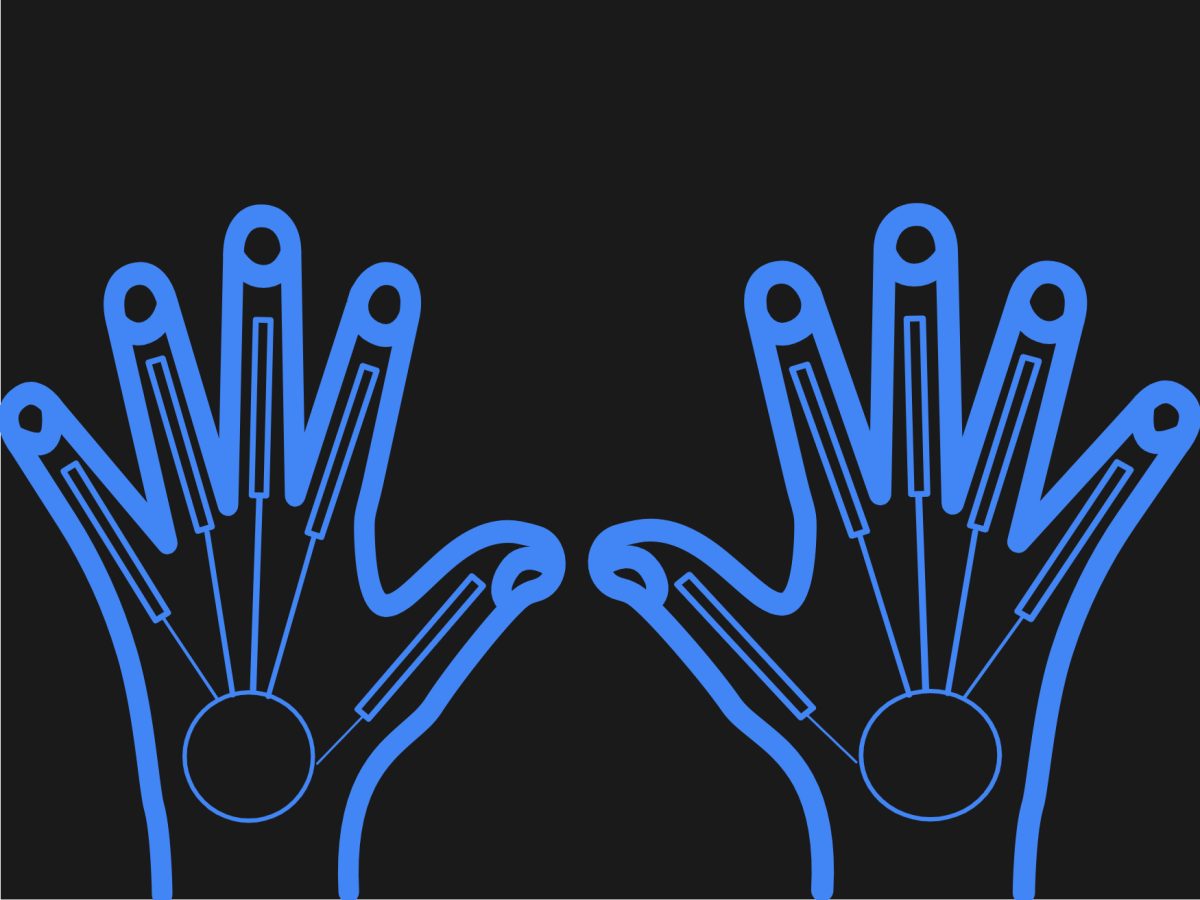
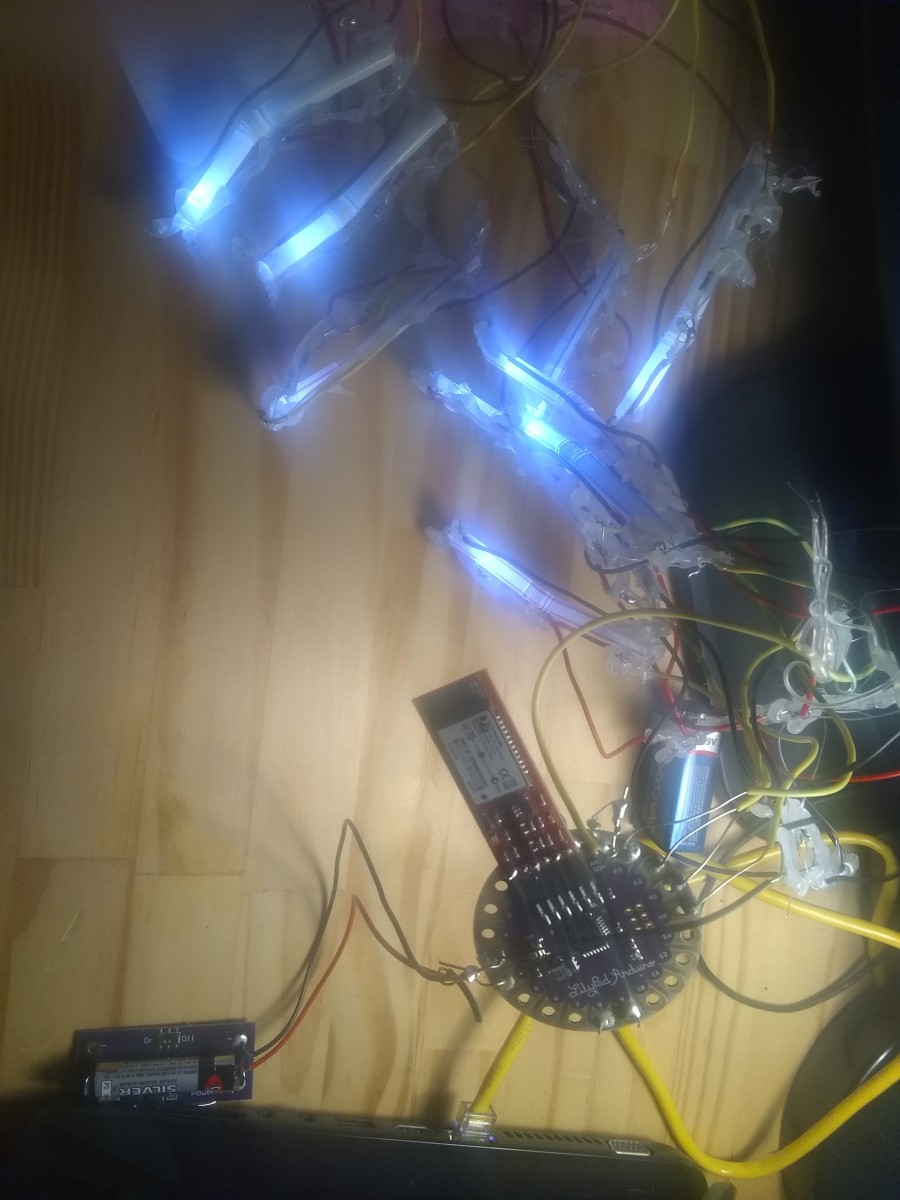
10 Flex Sensors (made from straws photo-resistors and resistors) When I did this project, I did not put the components for the flex sensor inside of the straw. Instead, I used hot glue to insulate the outside of the flex sensor circuit while the parts straddled both sides of the straw. I used small rubber bands to hold the gloves on the hands, and these worked well but started to cut off circulation to my fingers after a while. It would probably be better to use velcro strips. To make the ML gloves work better, you could also incorporate lateral movement. 2 Arduino Lilypads (or similar product, but keep in mind the voltage on the output pins and the number of analog pins) 2 Bluetooth modules for Arduino (I used the Silver Mate from sparkfun.com) 2 AAA battery cells 1 PC (powerful enough to do the Arduino and Python programming on) 1 PC Bluetooth module 1 Electrical tape (optional) Various colored wires of different lengths
Some Words Of Caution Before You Begin
Before we start, I’d like to talk about some problems I ran into during this project and things that I could have done differently. The primary thing that wasn’t obvious to me at the time was something I’d only learn about later after I started this project. There is a new field of Machine Learning that is just beginning to take off called Tiny ML. I first learned of this under the name edge computing. It is a very new way of using Machine Learning on small power-constrained devices. The drawback of using doing ML the traditional method in something like TensorFlow 1.x was that in the end, the inference had to be done on the computer. If the gloves had become prevalent, it would have meant that the device wouldn’t have been very portable. I would have instead had the inference done on the Arduino Lilypads, so I could have made an app on Android or IOS that would receive the ML inference from the gloves. Another drawback of the gloves is that in the end, they were only able to recognize about ten characters from the keyboard reliably. I chalked this up to simply not having enough training data to support a fully functioning model. Still, I have to admit that seeing it work at all after the many long hours I spent on the project was satisfying enough. The last problem I ran into was the flex sensors not being sensitive enough to catch all of the motions of the fingers, as hardly any resistance changes for some keys typed. Putting the flex sensors contained within the straws could remedy this. Also, during the writing of this article, I was advised that the framing of it was necessary. That I should not use the F word. No, not that F word, but the word failure. So here on out, problems with the project will be referred to as drawbacks.
1. Making the Flex Sensors
This project requires the use of flex sensors to record the finger movements of the hands when typing the data to train the Machine Learning Model. The flex sensors I used were DIY, they work by a light shone against a photoresistor. The bending of the fingers changes the light let through the straw onto the photoresistor.
Materials Required
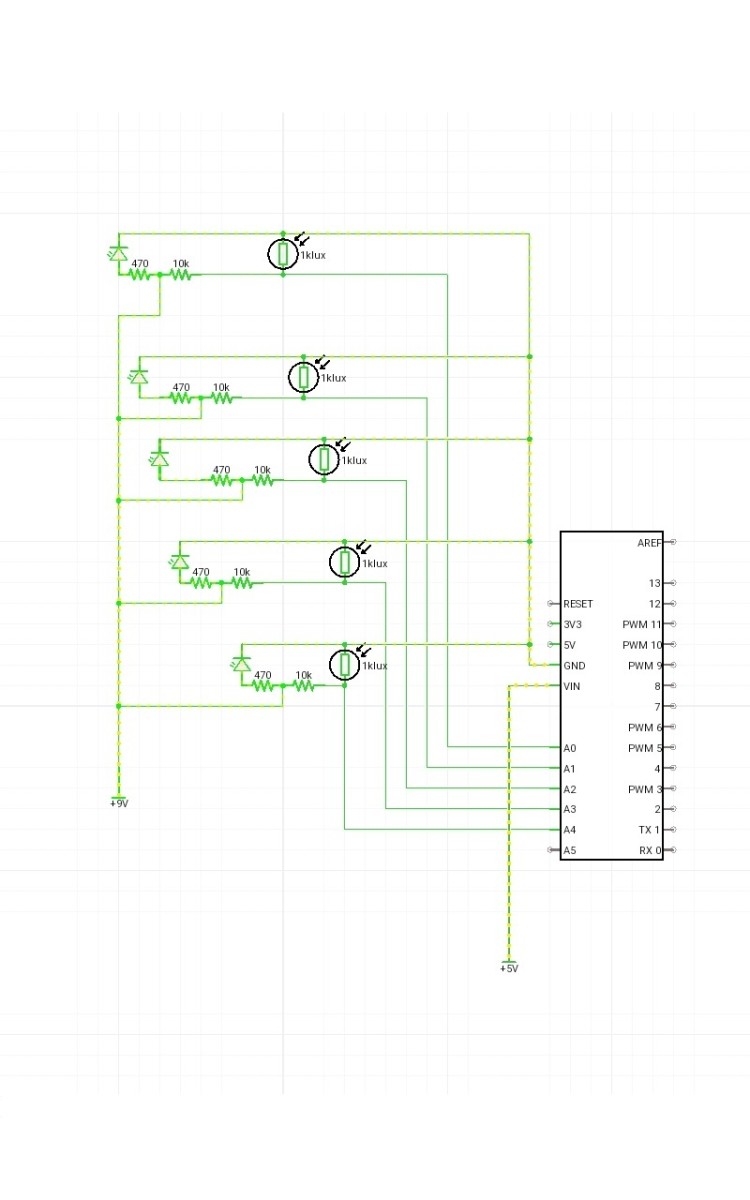
10 Photoresistors 10 LEDS(Light Emitting Diode) 10 470 ohm resistors10 10 Kohm resistors Copper wire of varying lengthsInsulating tape or hot glue to prevent short-circuits or conceal the light10 plastic strawSoldering ironBoost Converter or 9-volt cell sourceSolder
Instructions
Step 1: The straw will have to be cut to the right length. This measurement could vary depending on the length of the fingers, but this will likely be several inches. The pinky, thumb, and middle fingers will likely be relatively different sizes, so will need different straw lengths. Step 2: The LED should be connected to both sides of the flex sensor circuit. This will be at the opposing end from where you are going to put the photoresistor. Be sure you know which side of the LED is positive and which side is negative. For remembering this, I have a mnemonic that goes like Annual Polkadot Conference Nexus. Anode->Positive->Cathode->Negative. Step 3: The positive side will be connected to a 470-ohm resistor. Between the 470 ohm resistor and a 10K ohm resistor, a wire needs to be soldered. This is so the LED will receive approximately 19 milliamps of current, while the photoresistor gets a relatively small amount of current. This wire will either go to a boosted 9v source, or an extra power source. Step 4: The photoresistor should be placed on the opposite side of the flex sensor circuit(where the LED is). One end of the photoresistor will be connected to one of the analog pins (A0, A1, A2, A3, A4) for each finger. The other end will be connected to the ground and the other side of the straw, up to the LED. Step 5: (drawback )It is important to remember at this point that once you have all the components put together the flex sensor will probably work better if all the components are within the straw. Step 6: The power source for the flex sensor can come from a separate 9-volt cell. But I suggest trying to use a boost converter to boost 3.3 volts or 5 v to 9v, to have enough power for the LEDs. Step 7: The pull-down resistors may need to be used, but you’ll have to look into this.
2. Getting Into the Analysis of the Project
It makes the most sense to start with the harvesting of data, which will build the foundation for the rest of the project. Essentially what pyhthonserialmlgloves1.1.py does, is capture data in the form of a command-line interface. While the schematic does not show the Bluetooth modules or boost converter, they will need to be connected. Although the boost converter is optional, it is recommended. Bluetooth modules are relatively easy to connect if they come with headers already soldered on. The user training the gloves would type a certain amount of times to have enough data for the model to learn the associations to make inferences in the ML model script. We communicate all the data from the Arduino Lilypads (or similar Arduino devices) through the serial communication ports. Each Bluetooth module should have its com port. The data is then extracted and processed, then exported to a CSV. By performing this action, it allows the ML model script, which a future tutorial will explain, to perform inference(classification). The following code imports a few things so that for Python to use. We now import the library serial, as we’ll be working with serial communication to and from the Arduino Lilypads. We also import re to do regular expressions. After this, we import threading because it’s essential not to have parts of the program block. Blocking methods in Python block the flow of the program from continuing. serial and msvcrt methods are blocking. Therefore, it is vital to use the serial and critical capturing parts of the program to keep this in mind. Finally, we import msvcrt and CSV for key capturing and working with comma-separated values.
Required Libraries
Serial in the Morning
The code found below opens up serial communication channels between the computer and the Arduinos. The variable ser0 is for one hand while ser1 is for the other. The arguments given are for setting which com ports will be opened, things like baud rate, and also how much data will be transferred.
Having Some Class
This is the class serprocedure. It does most of the processing for the data coming into the computer. First, we declare our class, then we try them to see if the properties do not already exist. If they don’t exist then we declare/initialize them.
Being Constructive
The init constructor is then defined. We use flags to control the flow of the program and decide whether or not to perform further extraction or to throw away the result.
Doing Your Research
If you are familiar with regular expressions, then you’ll be at home with re.Search. Re.search searches through the data for the analog indicator and some digits. We perform validation to check if found does not equal None. After this, if we find a group, then it appends to the sensor list. If we see this, the mcounter also is incremented by 1.
Going Further
Further extraction performs further data processing and extraction on the data coming in from the ML gloves.
Together but Apart
Exporttocsv is a method used to take all of the gathered data from further extraction and the code in extract analog and puts them into neat individual cells.
The Bigger the Loop, the Bigger the Programmer
Serdatalooper loops through values for each flex sensor. If the flag is set to 0 it is one hand, otherwise, it is the other hand’s data.
3. Another Example, Please!
When I did this, I probably could have gathered more data than I did. If you’re trying to improve on the design of the gloves, aiming for a dataset with 1000 examples per character might be a good goal. Obtaining 1000 examples doesn’t necessarily mean a person has to type each character laboriously. You could gather a custom dataset from other users for a fee or for free. It also could have been made more user-friendly by passively gathering data as the user goes about their regular typing experience, instead of mundanely having to type each letter x amount of times. Read_from_serial reads the bytes until “\n”. I calculated this to be ~30, but this particular area of the code could improve. What I figured was happening is that there are ten characters for each integer and character coming in from the gloves, thus amounting to 30 bytes. Since characters are 1 byte, and the low byte is used on integers coming in from the Arduinos, making them 1 byte as well. It’s then appended to the payload containing b’’. Then the object serprocobj is instantiated from the serprocedure class.
4. The Final Thread
The important ideas involved in main that may not immediately be obvious are the key fetching and threads. The key fetching is done by key = msvcrt.getch(). Remember when I told you earlier about certain things being blocking? The variables t, t1, and t.start(), t1.start() prevent the different serial calls from blocking, thus facilitating the normal progression of the code flow. reset_input_buffer is another important method. I found out the hard way that without this, some of the data remained in the buffers after the process ran.
Thank You!
Thank you so much for reading this tutorial! You may see the completed project at Brock’s Gists. For further in-depth information on this topic, you may want to visit my second tutorial on how to program machine learning typing gloves with Arduino. It can be found here: Arduino and Machine Learning Programming for ML Gloves This article is accurate and true to the best of the author’s knowledge. Content is for informational or entertainment purposes only and does not substitute for personal counsel or professional advice in business, financial, legal, or technical matters. © 2021 Brock Lynch