Paico Oficial on Unsplash
The Advantages of Scheduling Posts for Facebook Pages
Having the ability to schedule posts has a lot of advantages. First of all, it gives you freedom. You can post content and have it published at a later date or time. Second, you can plan ahead to post in days or hours where you could get the most reach or engagement. In return, you can spend more time focusing on your content quality and marketing strategy. You can also utilize post scheduling to make sure that you always have some fresh content to offer even if you are on a break or vacation.
Schedule Posts for Facebook (via Creator Studio) in 2021
As you may have noticed already, the option to schedule posts is no longer included in the “Write Post” feature in Facebook Pages. This is mainly due to the fact that Facebook has completely moved it to Creator Studio. At first, you may think it’s such a hassle because going to Creator Studio takes a few more clicks. However, it’s actually better because now you have the ability to schedule posts for multiple pages. It’s also easier to schedule multiple posts for different pages as the Creator Studio offers a streamlined platform for managing content. In order to schedule a post, you must either be the owner of the page or you have been given permission to manage it. If that’s not an issue, then you simply follow these steps:
1. Click on Facebook Creator Studio
Head over to Facebook Creator Studio and then from the menu on the left, go to Content Library.
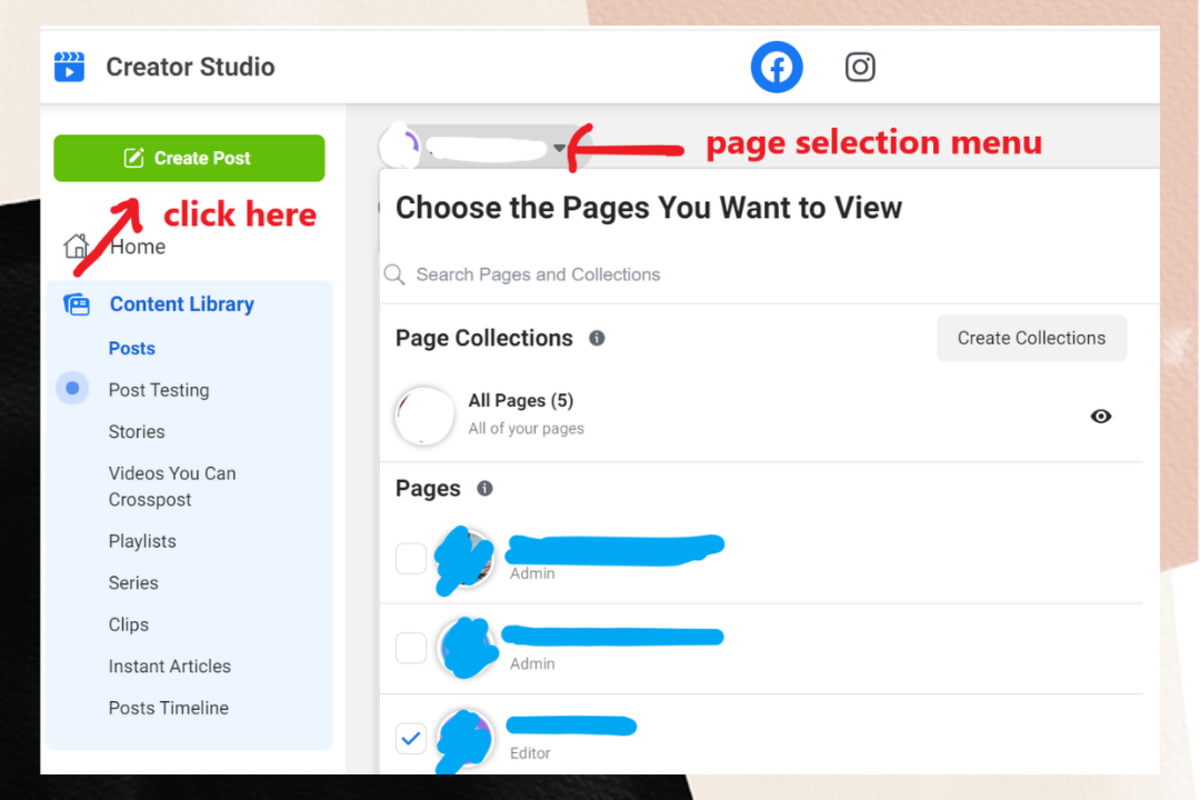
2. Click on Posts
From the Content Library, go to Posts. You should be seeing a list of all your posts. At the top of it, there should be a dropdown selection where you can choose the pages that you want to view. You can select just one page or select multiple pages. The post list will be updated according to your page selection.
3. Create Your Post
The next thing that you should do is create the post that you wish to schedule. To do this, click the green “Create Post” button. It is located at the top left of the Creator Studio menu. Doing so will allow you to create different types of posts but for now, just stick on selecting “Create Post”.
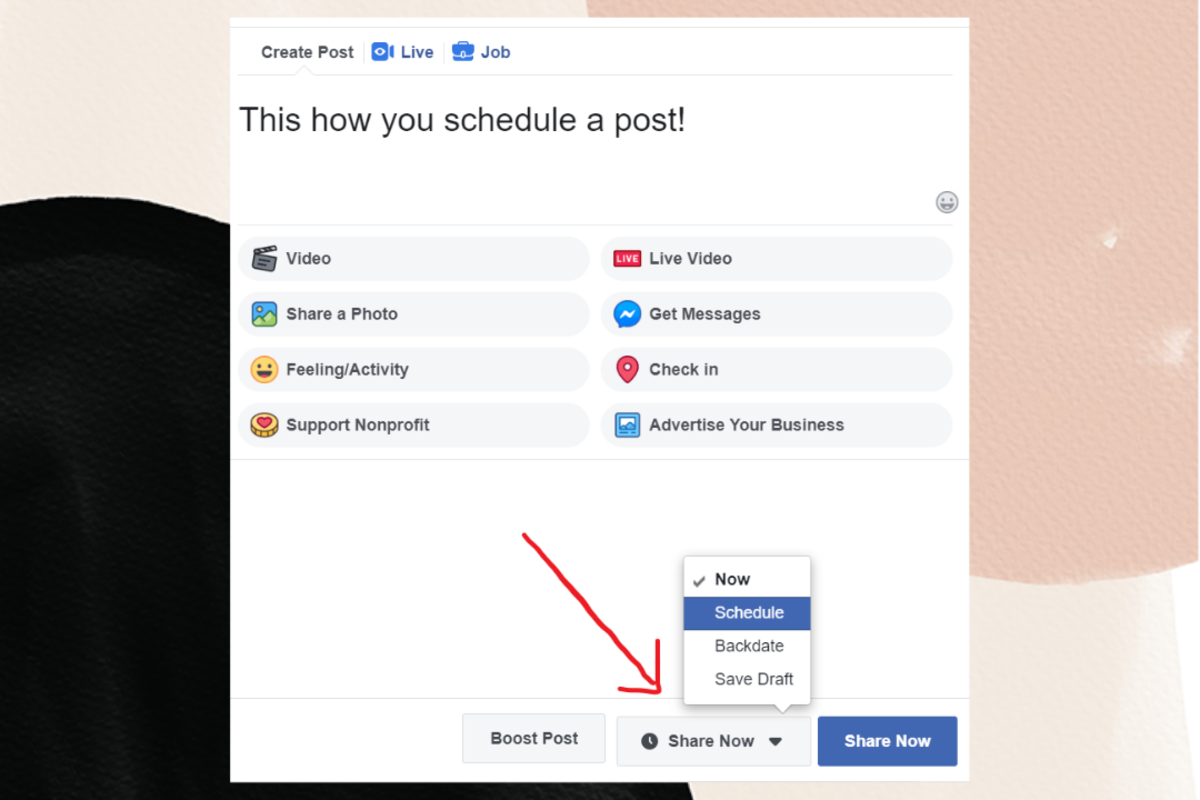
4. Click on “Share Now”
Create the post like you normally do. Once you are done, click the grey “Share Now” button. Make sure that you do not click the blue one!
5. Select the Date and Time for your Post
After clicking the grey “Share Now” button, it should display four options. Select “Schedule” and wait for the schedule post window to appear. Once you see it, you must select a date and time in the future to publish your post. Review your selection and once confirmed, click “Schedule”.
6. Schedule Post
It should take you back to the create post window. From there, simply click the blue “Schedule Post” button and that’s it! You have successfully scheduled your post.
7. Check Your Post and Edit or Cancel if Needed
To view it, go back to the post list and click the “Scheduled” tab. It should show a list of all your scheduled posts. You may then opt to preview, publish, cancel or edit the scheduled post you’ve selected. That’s it!
A Few Things to Note when Scheduling Posts
You cannot schedule posts for your personal Facebook profile. This only works for Facebook Pages. You also cannot schedule posts for your page by using the Facebook app. You can create a post and schedule it to be published on multiple pages. You can upload videos and schedule them to be published at a later date. The schedule post option is not possible for Facebook Stories.
This content is accurate and true to the best of the author’s knowledge and is not meant to substitute for formal and individualized advice from a qualified professional. © 2021 Kent Peligrino