You may also intrested in our tutorial How to Setup HAProxy on Ubuntu & Linuxmint .
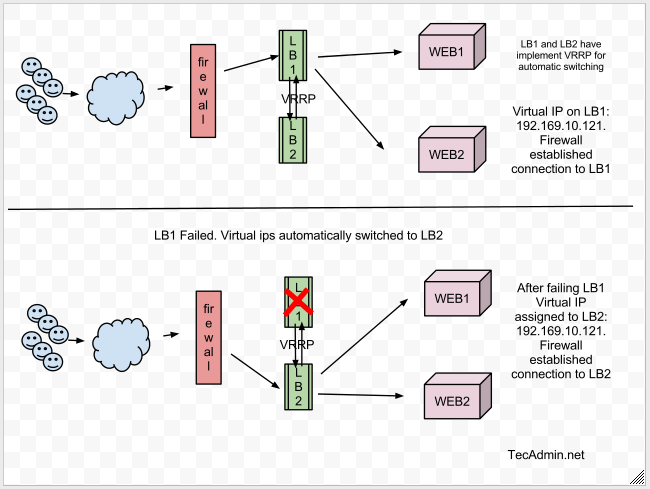
I hope you get a better understanding of the setup with the above structure. Let’s move to the configuration IP failover setup between LB1 and LB2 servers.
Step 1 – Install Required Packages
First of all, Use the following command to install required packages to configure Keepalived on the server.
Step 2 – Install Keepalived
Keepalived packages are available under default apt repositories. So just use a command to install it on both servers.
Step 3 – Setup Keepalived on LB1.
Now create or edit Keepalived configuration /etc/keepalived/keepalived.conf file on LB1 and add the following settings. Update all red highlighted values with your network and system configuration.
Step 4 – Setup KeepAlived on LB2.
Also, create or edit Keepalived configuration file /etc/keepalived/keepalived.conf on LB2 and add the following configuration. While making changes in the LB2 configuration file, make sure to set priority values to lower than LB1. For example below configuration is showing 100 priority value than LB1 has it 101.
Step 5 – Start KeepAlived Service
Start keepalived service using the following command and also configure to autostart on system boot.
Step 6 – Check Virtual IPs
By default virtual IP will be assigned to the master server, In the case of master gets down, it will automatically assign to the slave server. Use the following command to show assigned virtual IP on the interface. Sample output
Step 7 – Verify IP Failover Setup
Shutdown master server (LB1) and check if ips are automatically assigned to slave server.ip addr show eth0
Now start LB1 and stop slave server (LB2). IPs will automatically assigned to master server.ip addr show eth0
Watch log files to insure its workingtailf /var/log/syslog
Sample Output