This tutorial will provide you with a quick and easy way to setup DKIM (DomainKeys) with the Postfix Mail server running on Ubuntu and Debian-based systems.
Prerequisites
Before we install and configure OpenDKIM for Postfix, we need to make sure that we have the necessary prerequisites in place.
First and foremost, you will need a working Ubuntu system with root access. You will also need to have Postfix installed and configured. The last prerequisite is that you should have a valid domain name with DNS access.
Without these prerequisites in place, you will not be able to install and configure OpenDKIM on your server.
Step 1: Install Opendkim Package
Once you have all the prerequisites in place, you can start installing OpenDKIM. We will be using the apt package manager to install OpenDKIM on Ubuntu. To install OpenDKIM, you will need to run the following command: Then add the postfix user to the opendkim group.
Step 2: Generate Public and Private DKIM Keys
The next step is to create a proper directory structure to keep the Key files secure. Run the following commands to create a directory and set permissions. Now, generate your public and private DKIM keys using opendkim-genkey command line utility. All the commands are using “example.com” as a domain name. Replace it with your real domain name. We also need to choose a selector name, This can be any unique string, that helps Mail servers to identify the correct DKIM key from the DNS record. Below command will use default as selector key: This command will generate a public and private key pair for you. The private key will be stored in the file “selector.private”, and the public key will be stored in the file “selector.txt”. In our case, The filenames are “default.private” and “default.txt”. Once you have generated the keys, you will need to set appropriate permissions on the private key file:
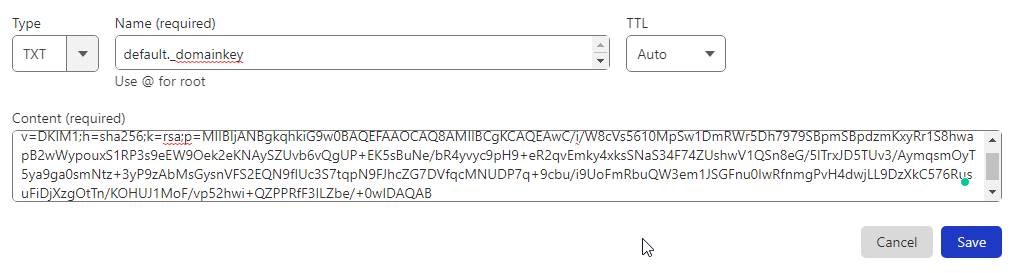
Step 3: Setup DKIM Keys to Your DNS Record
Once you have generated the public and private DKIM keys, you will need to add them to your DNS record. To do this, you will need to add the TXT record to your DNS zone file. This record detail can be found under the default.txt file, generate with the private key: You will see the output below: Remove all the quotes (“) and blank spaces from the record value, then publish it to the DNS zone. See the below screenshot:
You can verify the DNS record by running the following command.
Step 4: Confiugring OpenDKIM
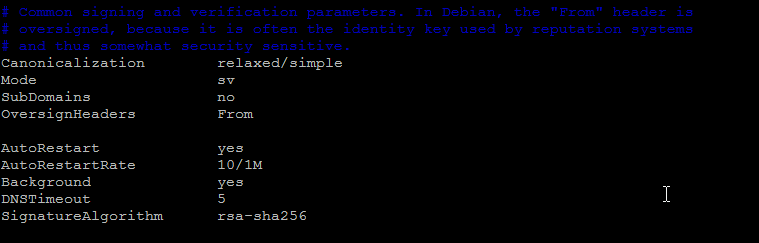
Once OpenDKIM has been installed and you have generated the DKIM public-private keys. you will need to configure it. To do this, you will need to edit the configuration file located at /etc/opendkim.conf. In this file, you will need to set the following parameters:
Step 5: Configure Postfix With OpenDKIM
The next step is to configure Postfix to use OpenDKIM. Save and close the file. Save the file and close it. Save and close the file.
Step 6: Test DKIM
Send an email from system terminal as below: Press CTRL+D to sent the email and get the terminal back. Watch the log files, On successful setup, you will see an log entry
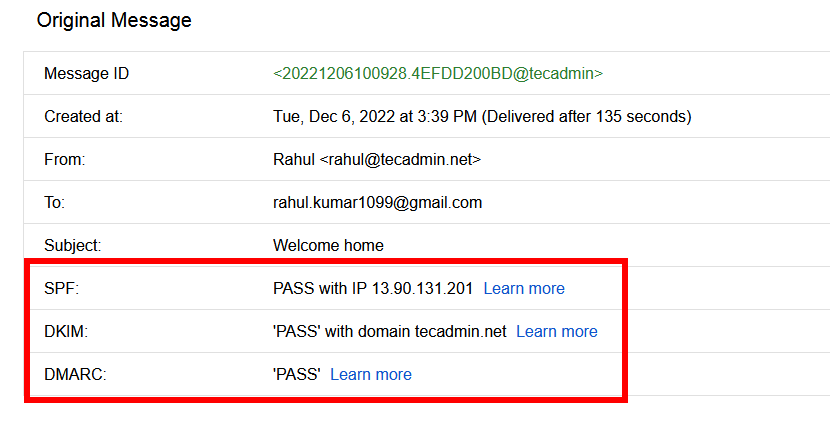
Check the email source. I have used my personal Gmail account to test this setup. I have received emails with the following header.
You can follow our next article, to create a DMARC record for your domain.
Conclusion
In this step-by-step guide, I have shown you how to install and configure OpenDKIM with Postfix on Ubuntu. I have also shown you how to generate the necessary public and private DKIM keys, and add them to your DNS record. Finally, I have shown you how to configure Postfix to use OpenDKIM. So, if you are looking to secure and protect your email traffic, DKIM is a great tool to use. Give it a try, and unleash the power of DKIM! If this article helped you out and you want to know more about OpenDKIM, you should check out our other articles on the topic. We have detailed guides on how to install and configure OpenDKIM on various platforms, as well as troubleshooting tips and best practices. So, make sure to check them out!