Photo by Glenn Stok
How I migrated my files and apps. The mistakes I almost made. The additional items I needed to purchase. And how to prepare your old Mac for recycling.
Why I Decided to Upgrade My Mac Mini
After a decade with my “Late-2012” Mac Mini, I felt it was time to buy a new one. I already know of all its advantages, so it was an easy decision to stay with the Mini rather than buy a complete Apple computer system. If you don’t already have one, here’s a quick list of the motives for staying with the Mac Mini. When I mention Apple to some friends, they say it’s too expensive. But they aren’t considering how the Mac Mini saves money. So, these are the reasons I tell them: When I decided to upgrade, the first thing I did was compare the models. I needed to be sure the 2020 version was suitable for my needs. In many ways it was better, definitely faster with the new Apple M1 chip 8-Core CPU and 16-Core Neural Engine. But there were physical changes that bothered me. However, I quickly found workarounds, as I’ll explain throughout this discussion.
What’s New With the 2020 Mac Mini?
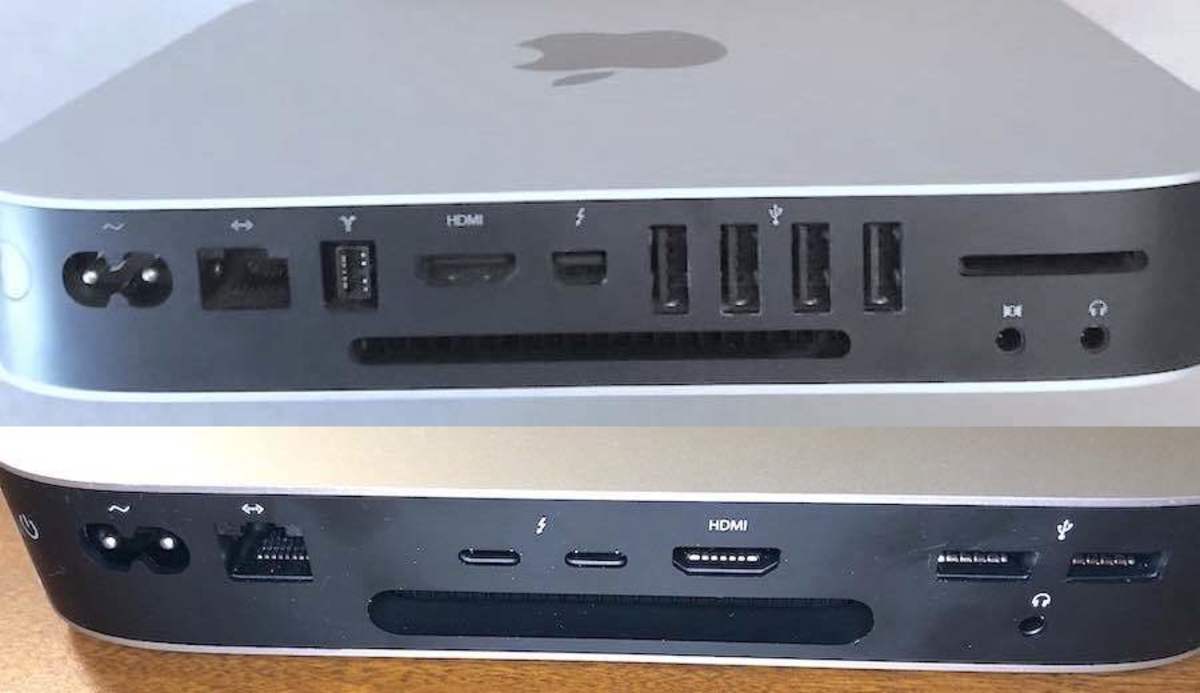
Apple now uses their own M1 Silicon chip, which integrates the CPU, GPU, Neural Engine, and I/O on one chip, making it much faster. You can still get the 8th Generation Intel Core processor, but I found the M1 chip runs faster and much cooler. The photo below shows the difference with the port arrangement on my old Mac Mini from 2012 and the 2020 model.
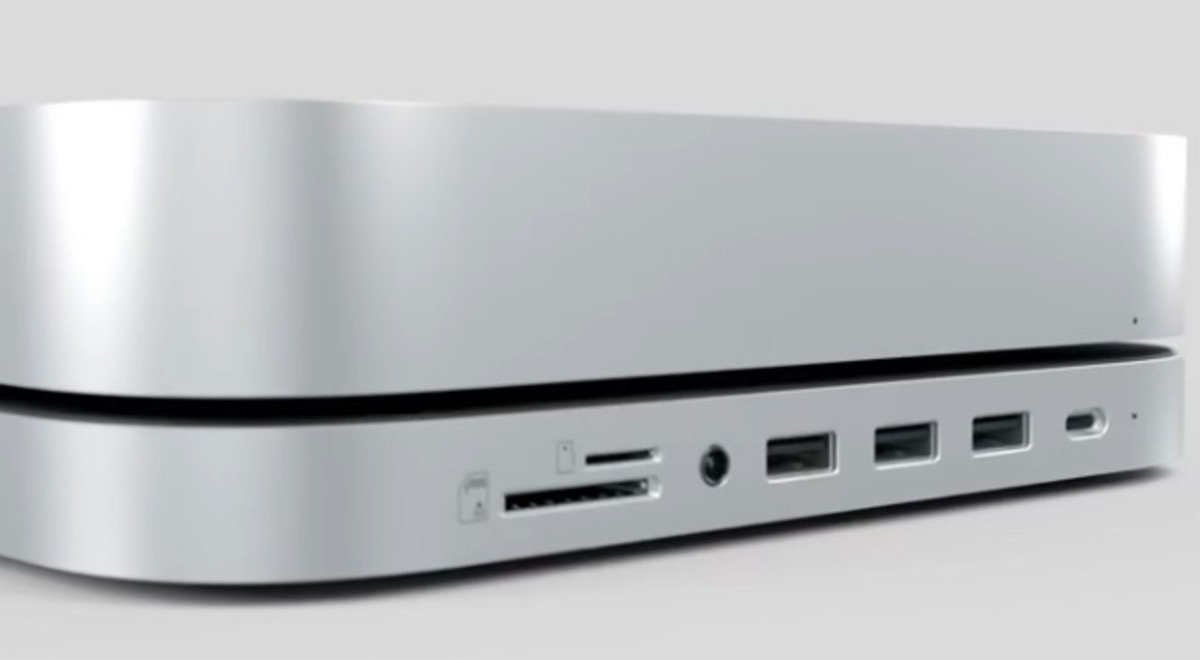
The 2012 model used to have four USB-A 3.1 ports. Now Apple only provides two. But they added two USB-C ports (also known as Thunderbolt) in their place. The Micro/SD Card Reader slot was also removed. You’ll see it on the right side in the photo below comparing the two models. Unfortunately, Apple eliminated it to make room for the two USB ports since the layout had been changed. The HDMI port on the 2012 model supported 1080p resolution while the 2020 model supports 4K. DVI, and VGA can be supported with optional adapters.
Technical Details of the 2020 Mac Mini
Apple M1 chip 8-Core CPU and 16-Core Neural Engine 8GB Unified Memory (Optionally 16GB) Two Thunderbolt / USB-C ports Two USB-A 3.1 ports HDMI 2.0 port Gigabit Ethernet port 3.5 mm headphone jack 802.11a/b/g/n/ac compatible Wi-Fi Bluetooth 5.0 Larger SSD than my old model: Now 512 GB Option for a 1 TB or 2 TB hard drive instead of SSD.
Solutions to Rectify the Port Limitations
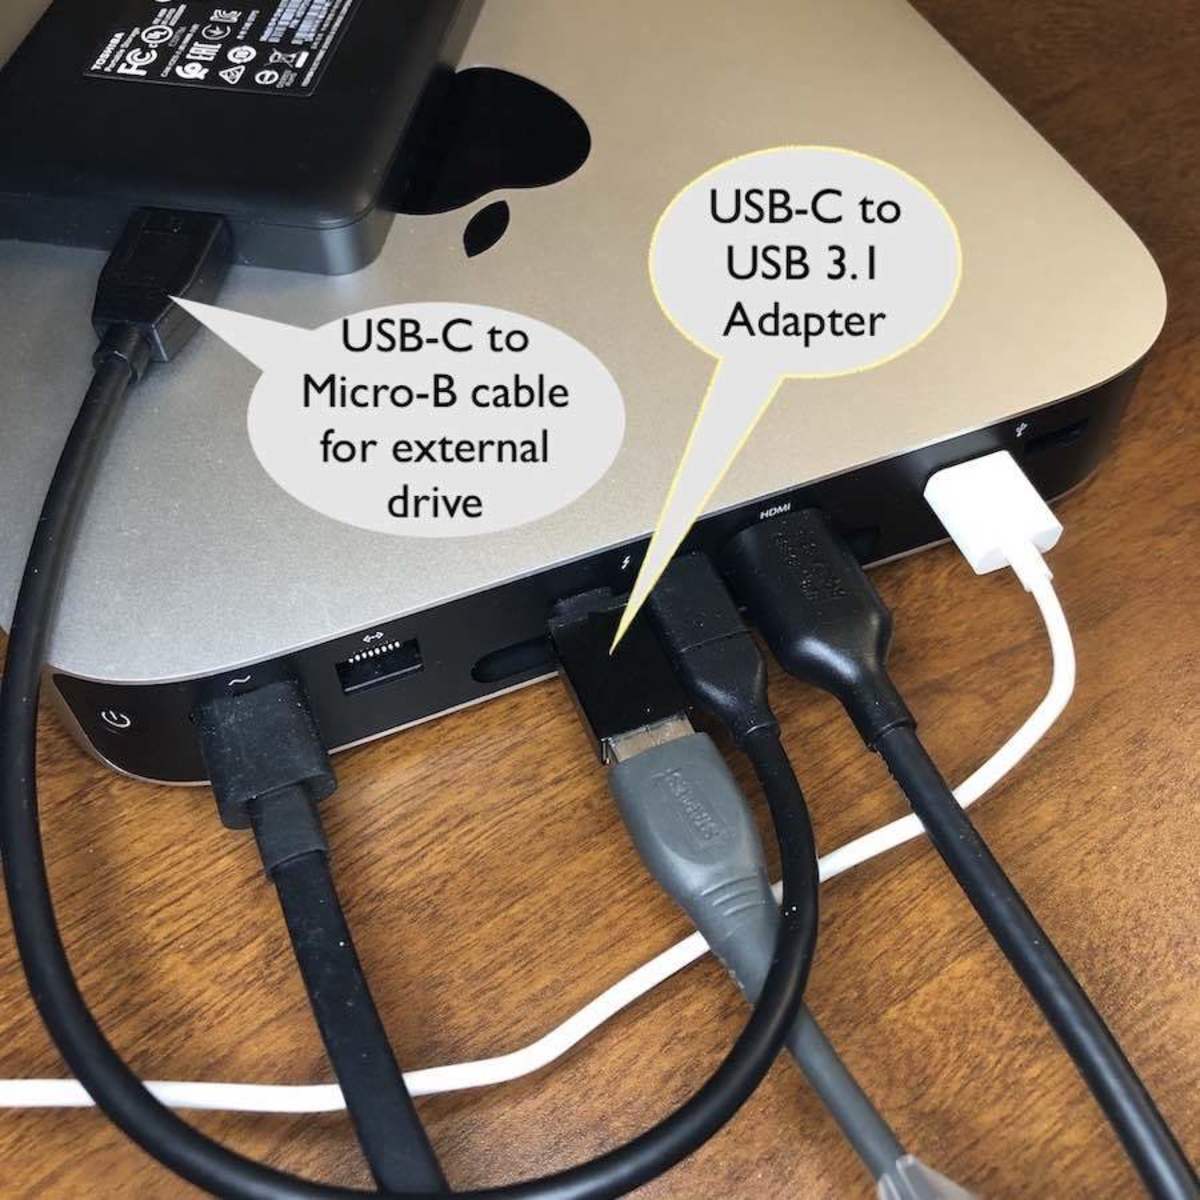
When I researched the issue with having only two USB 3.1 ports, I discovered many people were complaining about that as it was a problematic limitation. But I found three remedies. Photos by Glenn Stok One solution is an extra expense that I don’t recommend since I found a minimal-cost solution using simple $5 adapters. In addition, I found a USB-C cable for my external backup drive. I’ll review all three remedies.
1. The Expensive Solution (Not Necessary, IMO)
Image via Satechi displayed under fair use If you want those things, it’s something to consider. But if you just want to convert the two USB-C ports to USB 3.1, I’ll tell you what I did for only $5 each.
2. The Low-Cost Solution I Decided to Use
3. An Alternative to Connect an External Backup Drive
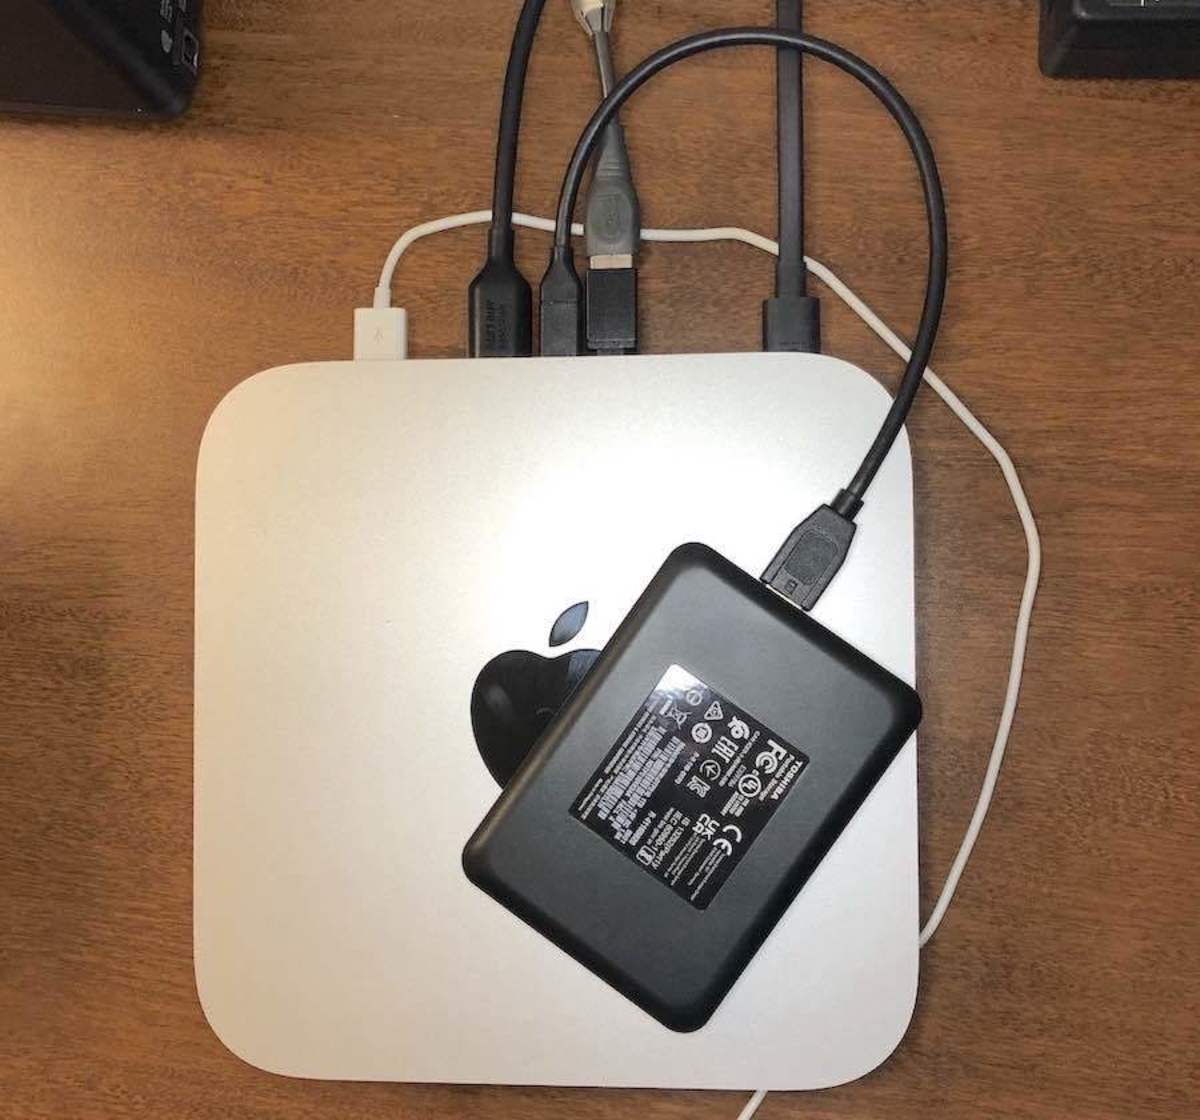
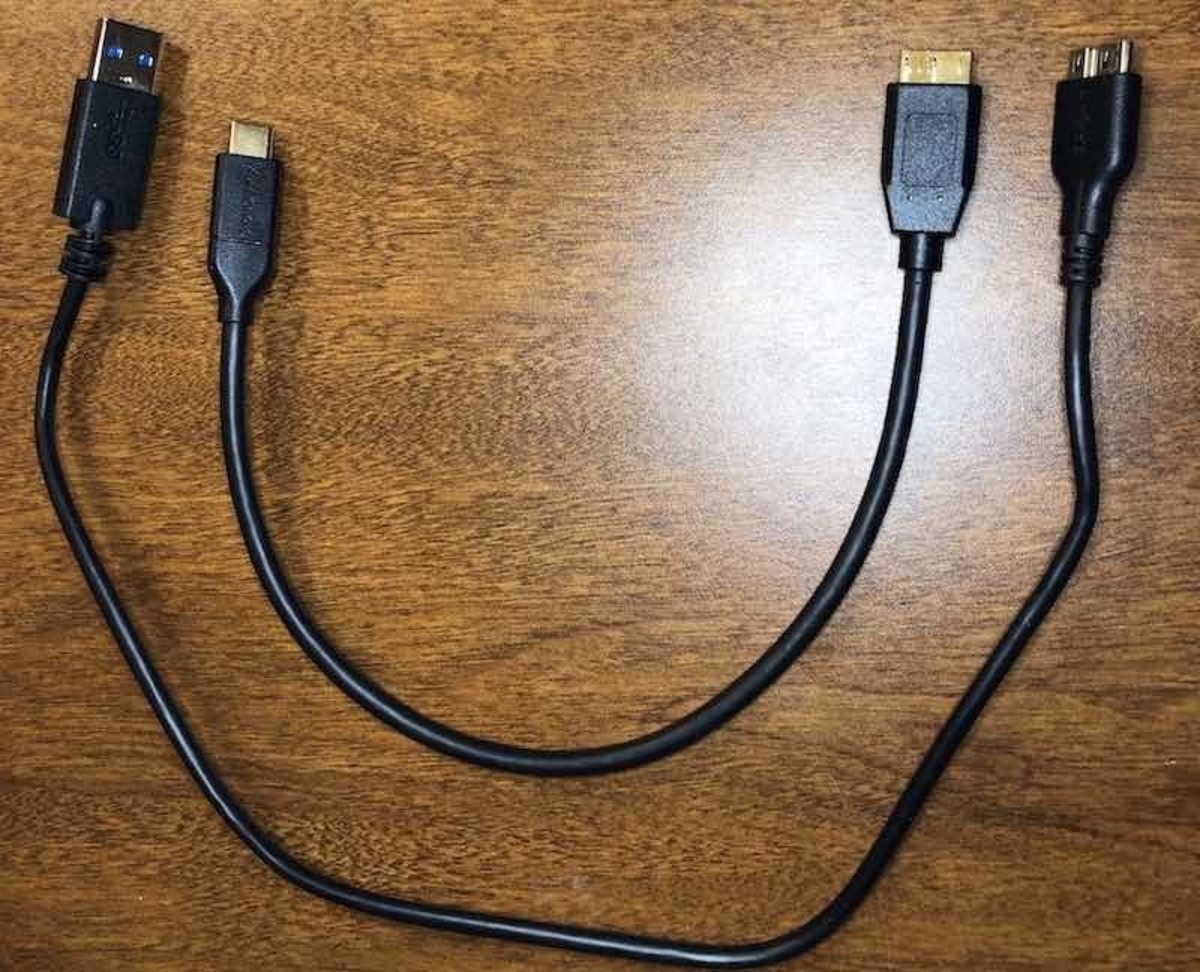
I could have used one of those $5 adapters to connect the external hard drive I use for Apple’s Time Machine backup. But I felt it’s best to connect it directly to a port. The photo below shows both cables. The original that came with my hard drive is the one for a USB 3.1 port. The slightly shorter cable is the new one I bought that connects to a USB-C port. That cable helped me free up another USB 3.1 port. I can understand why Apple didn’t worry about reducing the USB-A ports from four to two, with all these alternative connection methods. Photo by Glenn Stok And being such low-cost solutions, you don’t need to be concerned either. As you can see in the photo below, I was able to connect all my peripherals without the need for that expensive hub I mentioned earlier. And I even ended up with one USB-A port to spare.
Support for Intel-Based Apps
I was worried that some of my apps might not work with the M1 Silicon chip. I had read many reports saying you need to run a translator called Rosetta to convert the x86-64 binary code to the new architecture compatible with the M1 chip. Photo by Glenn Stok But those are out-of-date articles! I discovered that “Rosetta 2” is included in macOS “Big Sur” and will remain in future macOS. That automatically does the work for you the first time you run any Intel-based apps.1 After using my new Mac Mini for several months, I had no problems with any apps. All I noticed was a delay the first time I ran older apps. That delay was Rosetta doing the translation. After that, the apps always started up quickly.
Choosing Between a Hard Drive or SSD Drive
When I bought the 2012 model ten years ago, I decided to have an SSD drive instead of a hard drive. Apple also has a hybrid drive, but I didn’t particularly respect how the software handled the data storage. For example, the algorithm for hybrid drives stores rarely-used files on the hard drive and automatically moves files to the SSD that you often use. I feared that could shorten its lifespan. I’ll tell you why. The problem is that the algorithm could cause data to be written to the SSD much more often because it keeps moving files around. That could reduce the lifespan of the SSD because you can only write to each cell of a solid-state drive approximately 100,000 times before the cells begin to lose memory.2 That’s why I chose a regular SSD rather than a hybrid. And it was fine for me under normal use since I had it for ten years without noticing any problems. In 2012 that was a 386 GB SSD drive. Apple now gives the option for a 500 GB SSD drive. That’s sufficient for me, so I decided to go with an SSD again. Depending on your requirements, you may decide you need more file space. In that case, you can buy the Mac Mini with a 1 TB or 2 TB hard drive.
How to Copy All Your Files to a New Mac Mini
I wanted to make a complete mirror image of everything I had onto my new Mac Mini. Apple makes that process extremely easy with its Migration Assistant app. It copies more than just your files. All apps, user accounts, and computer settings are duplicated on the new Mac.
Utilities Needed for Data Migration
You’ll need to use two applications to complete the process. They are both in the Applications folder on your main hard drive, usually known as “Macintosh HD.” You’ll need the Disk Utility later to get your old system ready to sell unless you want to keep it. It is used to format the drive and reinstall a fresh copy of macOS. But for now, let’s concentrate on the migration task. I had my new and old Mac Minis sitting next to each other. That makes it easy since you probably have only one monitor and keyboard, as I had. You’ll need to go back and forth between the two of them as you run various tasks of the Migration Assistant. But the process is straightforward, and I’ll walk you through it.
Begin with your new Mac Mini:
Begin by opening the “Utilities” folder under “Applications” on your new Mac in Finder. You will see the Migration Assistant and Disk Utility Apps there.
Now switch to your old Mac:
Switch back to your new Mac:
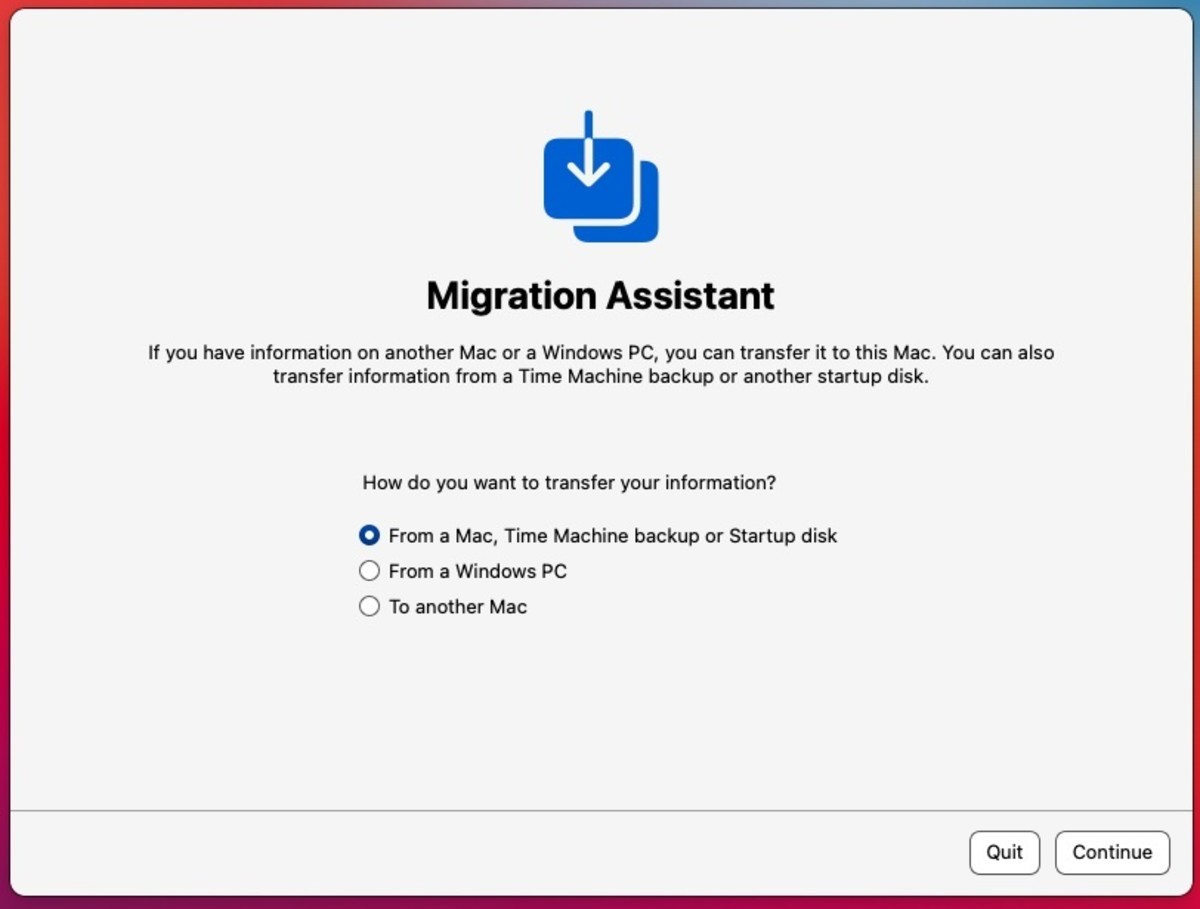
You’ll notice that the Migration Assistant was searching for the other Mac and found it. And now it’s asking you to be more precise where to copy from, and you need to select “Mac.” Screenshot by author You could set up the new Mac from your Time Machine backup, but you need to be sure you ran a complete final backup just before this process. That’s why I suggest the best choice is to copy from the old Mac. The other choices are Time Machine and Startup Disk. But copying from the Mac is best because you want to be sure you get the latest data transferred in case you missed the last backup.
Compare the Security Code on Both Macs
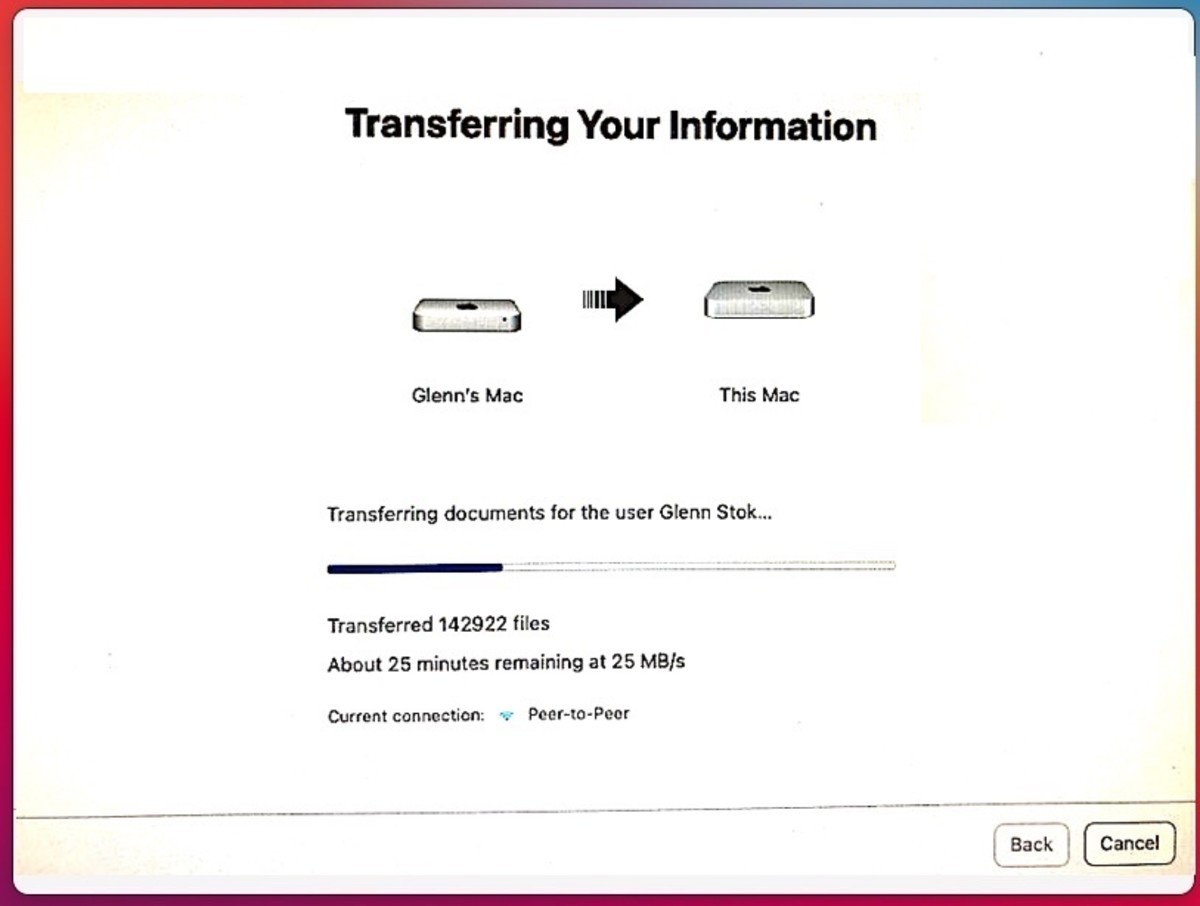
At this point, you might need to switch back to the old Mac if you see a security code displayed to make sure it matches on both computers. Next, click continue and switch back to the new Mac. Now you will see a menu asking you to select the information to transfer. Select all the items shown and click continue. Depending on how much data you have, the process could take several hours. So check back once in a while. You can quit the Migration Assistant on both computers when it’s done.
Two Final Steps
Vital Step for Migrating Microsoft Office
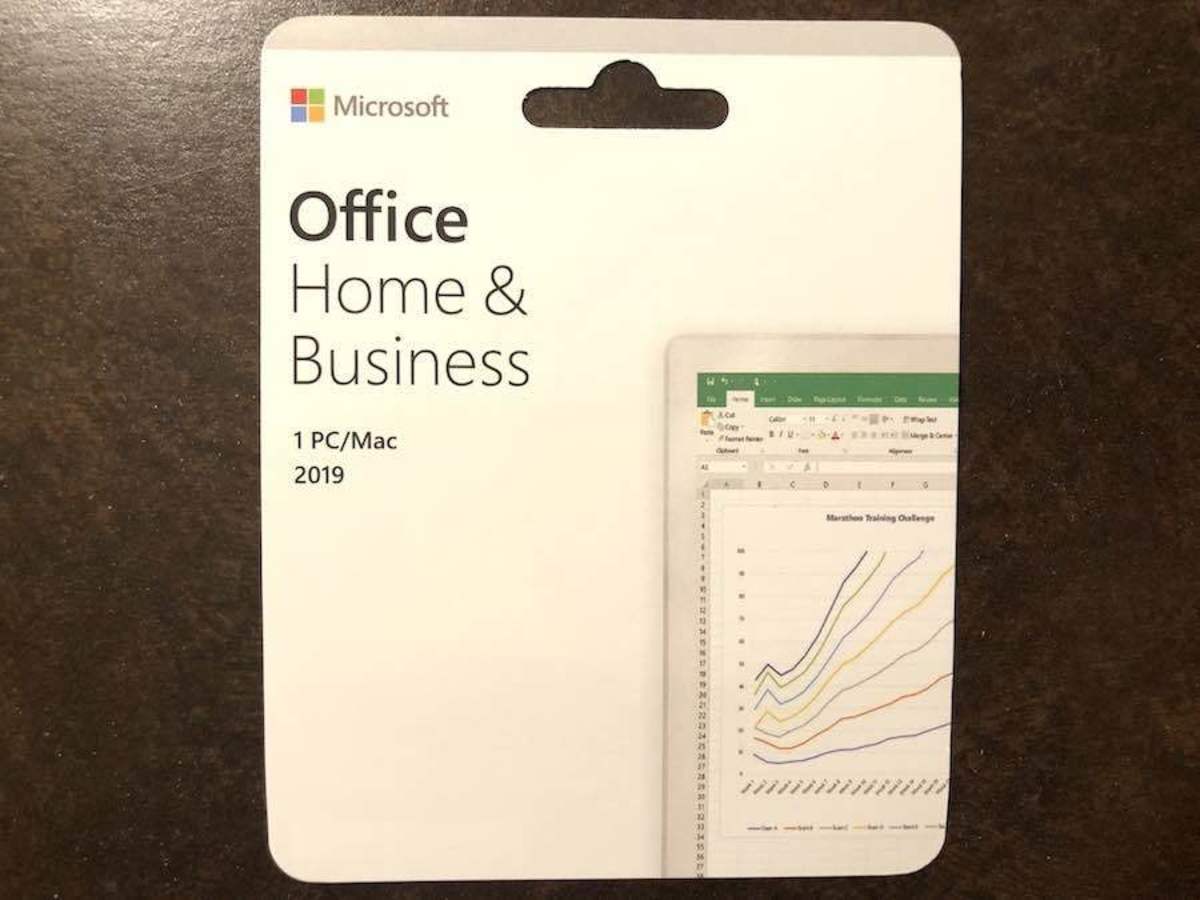
If you are using Word, Excel, or any of the applications in Microsoft Office, this is important to know. Many people might not realize they need to log out of MS Office on the old Mac before using it on a newer Mac. Otherwise, they need to buy an additional license from Microsoft. Screenshot by author I almost made that drastic mistake. When I tried to use Word on my new Mac, it kept asking me to log in and only worked a short time. Researching the issue led me to that critical step we need to take before erasing the data on the old Mac. So, remember this: You need to log out of MS Office on your old Mac before preparing it for resale. Otherwise, it will be too late, and you will not be able to use MS Office on your new Mac. If I had erased my old Mac and left Office logged in, I would have had to buy a new license. Luckily, I discovered that in time. I have been able to use all the Office applications on my new Mac with no problem since I logged off from Office on my old Mac.
Preparing Your Old Mac Mini for Resale or Gifting
I sold my old late-2012 Mac Mini for $250 on eBay. So I recommend you check to see what yours is worth now. It can go toward the cost of your new upgrade. Photo by author If you decide to sell it or even just give it away, follow these crucial steps to get it ready for recycling. I already mentioned that you should log off from your Apple ID account on your old Mac. But what if you forgot? You can still do it remotely from your new Mac.
How to Remove Your Old Mac From Your Apple ID Remotely
You can skip this if you already logged off from your Apple ID before getting rid of your old Mac. I’ll explain how to remove your old Mac from your account remotely in case you forgot to do it. If your old Mac is no longer in your possession, remove it from your Apple ID by clicking “System Preferences” on your new Mac and selecting “Apple ID” at the top. Now, on the left of the pop-up, you should see a list of all your devices. If you see your old Mac or any other device you don’t recognize, highlight its name and click “Remove from Account.” Note that if whoever has it now connects to the Internet with your Apple ID, it will reappear in this list. So it is crucial also to change your Apple password. Better yet, sign off from it BEFORE you sell it.
Sign out of iCloud and all Apple Services on Your Old Mac
Some Apple services might have conflicts if left logged in on both computers, even if you reset the old system. If you need help, Apple has a detailed review explaining how to achieve each step. Its link is in the references at the end of this article.3 These are the items you need to ensure you no longer have active on your old Mac.
How to Erase Your Old Mac and Reset to Factory Settings
Disk Utility is used to format the drive and reinstall a fresh copy of macOS so your old Mac will be ready to sell or give away.4 Follow these steps:
Recap
Remember to do all the following steps before you sell or give away your old Mac: Screenshot by author
References
This content is accurate and true to the best of the author’s knowledge and is not meant to substitute for formal and individualized advice from a qualified professional. © 2022 Glenn Stok
title: “What I Needed To Do When Upgrading To A New Apple Mac Mini” ShowToc: true date: “2022-11-05” author: “Nicole Wright”
Photo by Glenn Stok
How I migrated my files and apps. The mistakes I almost made. The additional items I needed to purchase. And how to prepare your old Mac for recycling.
Why I Decided to Upgrade My Mac Mini
After a decade with my “Late-2012” Mac Mini, I felt it was time to buy a new one. I already know of all its advantages, so it was an easy decision to stay with the Mini rather than buy a complete Apple computer system. If you don’t already have one, here’s a quick list of the motives for staying with the Mac Mini. When I mention Apple to some friends, they say it’s too expensive. But they aren’t considering how the Mac Mini saves money. So, these are the reasons I tell them: When I decided to upgrade, the first thing I did was compare the models. I needed to be sure the 2020 version was suitable for my needs. In many ways it was better, definitely faster with the new Apple M1 chip 8-Core CPU and 16-Core Neural Engine. But there were physical changes that bothered me. However, I quickly found workarounds, as I’ll explain throughout this discussion.
What’s New With the 2020 Mac Mini?
Apple now uses their own M1 Silicon chip, which integrates the CPU, GPU, Neural Engine, and I/O on one chip, making it much faster. You can still get the 8th Generation Intel Core processor, but I found the M1 chip runs faster and much cooler. The photo below shows the difference with the port arrangement on my old Mac Mini from 2012 and the 2020 model.
The 2012 model used to have four USB-A 3.1 ports. Now Apple only provides two. But they added two USB-C ports (also known as Thunderbolt) in their place. The Micro/SD Card Reader slot was also removed. You’ll see it on the right side in the photo below comparing the two models. Unfortunately, Apple eliminated it to make room for the two USB ports since the layout had been changed. The HDMI port on the 2012 model supported 1080p resolution while the 2020 model supports 4K. DVI, and VGA can be supported with optional adapters.
Technical Details of the 2020 Mac Mini
Apple M1 chip 8-Core CPU and 16-Core Neural Engine 8GB Unified Memory (Optionally 16GB) Two Thunderbolt / USB-C ports Two USB-A 3.1 ports HDMI 2.0 port Gigabit Ethernet port 3.5 mm headphone jack 802.11a/b/g/n/ac compatible Wi-Fi Bluetooth 5.0 Larger SSD than my old model: Now 512 GB Option for a 1 TB or 2 TB hard drive instead of SSD.
Solutions to Rectify the Port Limitations
When I researched the issue with having only two USB 3.1 ports, I discovered many people were complaining about that as it was a problematic limitation. But I found three remedies. Photos by Glenn Stok One solution is an extra expense that I don’t recommend since I found a minimal-cost solution using simple $5 adapters. In addition, I found a USB-C cable for my external backup drive. I’ll review all three remedies.
1. The Expensive Solution (Not Necessary, IMO)
Image via Satechi displayed under fair use If you want those things, it’s something to consider. But if you just want to convert the two USB-C ports to USB 3.1, I’ll tell you what I did for only $5 each.
2. The Low-Cost Solution I Decided to Use
3. An Alternative to Connect an External Backup Drive
I could have used one of those $5 adapters to connect the external hard drive I use for Apple’s Time Machine backup. But I felt it’s best to connect it directly to a port. The photo below shows both cables. The original that came with my hard drive is the one for a USB 3.1 port. The slightly shorter cable is the new one I bought that connects to a USB-C port. That cable helped me free up another USB 3.1 port. I can understand why Apple didn’t worry about reducing the USB-A ports from four to two, with all these alternative connection methods. Photo by Glenn Stok And being such low-cost solutions, you don’t need to be concerned either. As you can see in the photo below, I was able to connect all my peripherals without the need for that expensive hub I mentioned earlier. And I even ended up with one USB-A port to spare.
Support for Intel-Based Apps
I was worried that some of my apps might not work with the M1 Silicon chip. I had read many reports saying you need to run a translator called Rosetta to convert the x86-64 binary code to the new architecture compatible with the M1 chip. Photo by Glenn Stok But those are out-of-date articles! I discovered that “Rosetta 2” is included in macOS “Big Sur” and will remain in future macOS. That automatically does the work for you the first time you run any Intel-based apps.1 After using my new Mac Mini for several months, I had no problems with any apps. All I noticed was a delay the first time I ran older apps. That delay was Rosetta doing the translation. After that, the apps always started up quickly.
Choosing Between a Hard Drive or SSD Drive
When I bought the 2012 model ten years ago, I decided to have an SSD drive instead of a hard drive. Apple also has a hybrid drive, but I didn’t particularly respect how the software handled the data storage. For example, the algorithm for hybrid drives stores rarely-used files on the hard drive and automatically moves files to the SSD that you often use. I feared that could shorten its lifespan. I’ll tell you why. The problem is that the algorithm could cause data to be written to the SSD much more often because it keeps moving files around. That could reduce the lifespan of the SSD because you can only write to each cell of a solid-state drive approximately 100,000 times before the cells begin to lose memory.2 That’s why I chose a regular SSD rather than a hybrid. And it was fine for me under normal use since I had it for ten years without noticing any problems. In 2012 that was a 386 GB SSD drive. Apple now gives the option for a 500 GB SSD drive. That’s sufficient for me, so I decided to go with an SSD again. Depending on your requirements, you may decide you need more file space. In that case, you can buy the Mac Mini with a 1 TB or 2 TB hard drive.
How to Copy All Your Files to a New Mac Mini
I wanted to make a complete mirror image of everything I had onto my new Mac Mini. Apple makes that process extremely easy with its Migration Assistant app. It copies more than just your files. All apps, user accounts, and computer settings are duplicated on the new Mac.
Utilities Needed for Data Migration
You’ll need to use two applications to complete the process. They are both in the Applications folder on your main hard drive, usually known as “Macintosh HD.” You’ll need the Disk Utility later to get your old system ready to sell unless you want to keep it. It is used to format the drive and reinstall a fresh copy of macOS. But for now, let’s concentrate on the migration task. I had my new and old Mac Minis sitting next to each other. That makes it easy since you probably have only one monitor and keyboard, as I had. You’ll need to go back and forth between the two of them as you run various tasks of the Migration Assistant. But the process is straightforward, and I’ll walk you through it.
Begin with your new Mac Mini:
Begin by opening the “Utilities” folder under “Applications” on your new Mac in Finder. You will see the Migration Assistant and Disk Utility Apps there.
Now switch to your old Mac:
Switch back to your new Mac:
You’ll notice that the Migration Assistant was searching for the other Mac and found it. And now it’s asking you to be more precise where to copy from, and you need to select “Mac.” Screenshot by author You could set up the new Mac from your Time Machine backup, but you need to be sure you ran a complete final backup just before this process. That’s why I suggest the best choice is to copy from the old Mac. The other choices are Time Machine and Startup Disk. But copying from the Mac is best because you want to be sure you get the latest data transferred in case you missed the last backup.
Compare the Security Code on Both Macs
At this point, you might need to switch back to the old Mac if you see a security code displayed to make sure it matches on both computers. Next, click continue and switch back to the new Mac. Now you will see a menu asking you to select the information to transfer. Select all the items shown and click continue. Depending on how much data you have, the process could take several hours. So check back once in a while. You can quit the Migration Assistant on both computers when it’s done.
Two Final Steps
Vital Step for Migrating Microsoft Office
If you are using Word, Excel, or any of the applications in Microsoft Office, this is important to know. Many people might not realize they need to log out of MS Office on the old Mac before using it on a newer Mac. Otherwise, they need to buy an additional license from Microsoft. Screenshot by author I almost made that drastic mistake. When I tried to use Word on my new Mac, it kept asking me to log in and only worked a short time. Researching the issue led me to that critical step we need to take before erasing the data on the old Mac. So, remember this: You need to log out of MS Office on your old Mac before preparing it for resale. Otherwise, it will be too late, and you will not be able to use MS Office on your new Mac. If I had erased my old Mac and left Office logged in, I would have had to buy a new license. Luckily, I discovered that in time. I have been able to use all the Office applications on my new Mac with no problem since I logged off from Office on my old Mac.
Preparing Your Old Mac Mini for Resale or Gifting
I sold my old late-2012 Mac Mini for $250 on eBay. So I recommend you check to see what yours is worth now. It can go toward the cost of your new upgrade. Photo by author If you decide to sell it or even just give it away, follow these crucial steps to get it ready for recycling. I already mentioned that you should log off from your Apple ID account on your old Mac. But what if you forgot? You can still do it remotely from your new Mac.
How to Remove Your Old Mac From Your Apple ID Remotely
You can skip this if you already logged off from your Apple ID before getting rid of your old Mac. I’ll explain how to remove your old Mac from your account remotely in case you forgot to do it. If your old Mac is no longer in your possession, remove it from your Apple ID by clicking “System Preferences” on your new Mac and selecting “Apple ID” at the top. Now, on the left of the pop-up, you should see a list of all your devices. If you see your old Mac or any other device you don’t recognize, highlight its name and click “Remove from Account.” Note that if whoever has it now connects to the Internet with your Apple ID, it will reappear in this list. So it is crucial also to change your Apple password. Better yet, sign off from it BEFORE you sell it.
Sign out of iCloud and all Apple Services on Your Old Mac
Some Apple services might have conflicts if left logged in on both computers, even if you reset the old system. If you need help, Apple has a detailed review explaining how to achieve each step. Its link is in the references at the end of this article.3 These are the items you need to ensure you no longer have active on your old Mac.
How to Erase Your Old Mac and Reset to Factory Settings
Disk Utility is used to format the drive and reinstall a fresh copy of macOS so your old Mac will be ready to sell or give away.4 Follow these steps:
Recap
Remember to do all the following steps before you sell or give away your old Mac: Screenshot by author
References
This content is accurate and true to the best of the author’s knowledge and is not meant to substitute for formal and individualized advice from a qualified professional. © 2022 Glenn Stok
